
Precision Edge Guide for Circular Saw Cutting
Introduction
Anyone who has spent time in a cabinet shop knows the difference between a cut that’s “close enough” and a cut that’s actually square, straight, and repeatable. A Precision Edge Guide doesn’t look like much sitting on a shelf, but it changes how consistently you can break down sheet material with a handheld circular saw or run straight lines with a router. This guide covers what the tool does, where it earns its place in a workshop, and where it doesn’t.
What Is a Precision Edge Guide?
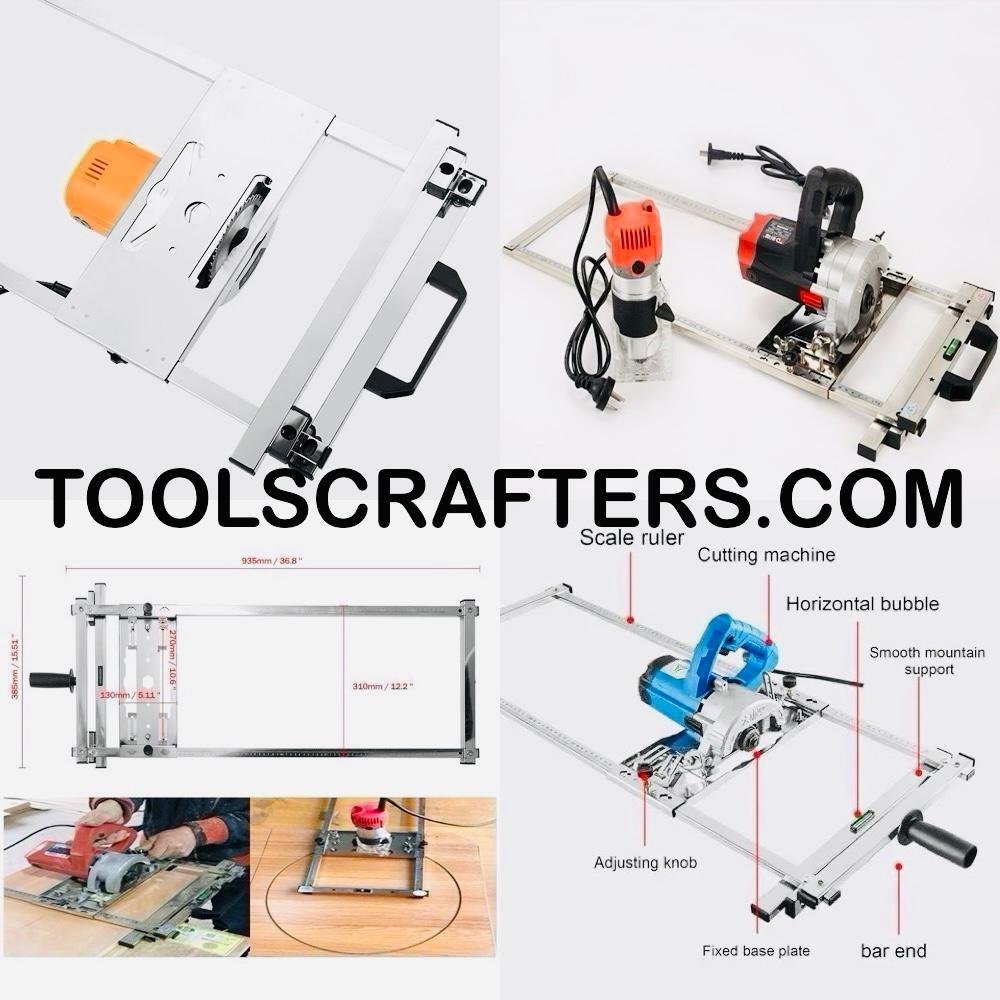
A Precision Edge Guide is a steel guide system that attaches to a handheld circular saw or a woodworking router and keeps the tool tracking in a straight, fixed line as you cut. It’s not a track saw rail, and it’s not the rip fence bolted to your table saw — it’s an aftermarket accessory built for tools that don’t otherwise have a built-in reference edge.
The core idea: instead of following a pencil line by eye, the saw or router base rides against a fence set at a fixed distance from the blade or bit. That fixed distance is what makes the cut repeatable, not just straight once.
Many systems also accept a pivot attachment, turning a router into a tool capable of cutting clean circles — something a circular saw guide alone can’t do. That combination is what separates this category from a basic clamp-on straightedge.
How It Works
The Sub-Base Connection
The guide attaches to the base plate of your circular saw or router, usually through a sub-base or bracket designed to sit flush against the tool’s existing plate. This connection has to be rigid — any flex here shows up as wobble in the cut line.
The Fence or Rail
From that sub-base, a rail or fence bar extends out to one side, riding along the edge of your material or against a separately clamped straightedge. Bar length and adjustment range differ by manufacturer, so check the exact reach on the specific product before you buy.
The Offset Setting
This is the part beginners usually skip, and it’s the part that actually matters. Every circular saw has an offset — the distance between the base plate edge and the actual face of the blade. A Precision Edge Guide lets you dial in that offset once, lock it, and trust it for every cut afterward. You’re measuring guide-to-edge instead of blade-to-line, which is far easier to get right consistently by hand.
Why Cabinet Makers Use Precision Edge Guides
Freehand Cutting Asks You to Do Three Things at Once
When you cut freehand with a circular saw, you’re tracking a pencil line by eye, keeping even forward pressure, and fighting the saw’s natural tendency to wander off-line — all at once. Any one going slightly wrong shows up in the cut, and over a four-foot rip even a steady hand tends to drift a couple of millimetres.
A guide removes the eye-tracking part entirely. You’re pressing a fence against an edge and pushing forward — a simpler physical task, which is why the cuts come out straighter with less experience required.
It Turns One Measurement Into Many Identical Parts
This is what actually changes workflow in a production shop. Say you need twelve identical side panels for a run of wardrobe carcasses. Freehand, you’re marking and checking every panel. With an edge guide, you set the offset once, cut the first panel, check it, and run the next eleven without re-measuring. The guide becomes the measurement — a real time saving on any job with repeated parts, which in cabinet work is most jobs.
Fewer Ruined Sheets
Sheet goods aren’t cheap, and a botched rip on a full sheet of ¾” plywood is wasted material and wasted time re-cutting a replacement part. A guide reduces the number of cuts that come out narrow, wide, or tapered, cutting down how much material ends up in the offcut bin instead of the finished piece.
Key Features
Steel or aluminum construction. Steel resists bending better under repeated use; aluminum is lighter to carry. Neither is objectively better — it depends on how you work.
Adjustable offset. A reliable guide lets you fine-tune the offset without guesswork, through a marked scale, dial, or sliding lock. A vague or hard-to-read adjustment defeats a lot of the accuracy benefit.
Router compatibility. Not every edge guide works with both a circular saw and a router — some are saw-only. Confirm the circle-cutting function specifically before buying.
Clamping or locking mechanism. Whatever the lock method, it needs to hold firm under the vibration of an actual cut. A guide that creeps mid-cut is worse than no guide, because you won’t notice until the cut is already made.
Advantages
Straighter cuts because the tool follows a fixed mechanical reference instead of a line tracked by eye.
Faster repeat cuts since the offset is set once and reused across identical parts.
Better accuracy on long rips, where freehand drift is most noticeable and costly.
Less wasted sheet material, because fewer cuts come out wrong the first time.
More consistent cabinet quality across a batch of doors, sides, and shelves — mismatched panel widths show up immediately during assembly.
One setup for multiple identical parts, the single biggest workflow advantage for a small production shop over one-off builds.
Router circle cutting on guides with a pivot attachment, opening up rounded corners, circular tabletops, and cutouts a circular saw can’t produce.
Compatible Materials
A Precision Edge Guide is generally suited to the sheet and solid materials most cabinet and furniture work is built from: plywood, MDF, particle board, laminate or melamine-faced board, hardwood, and softwood.
It’s worth being honest here — this is a wood-cutting accessory. If a listing claims metal-cutting capability, that’s tied to a specific blade and product, not something to assume applies generally. Match your blade to the material regardless of guide; the guide controls the line, not the blade’s cut quality.
Common Applications
In a cabinet or furniture shop, this tool shows up most often in:
– Kitchen cabinets and wardrobes — breaking down full sheets into carcass sides, bottoms, and shelves at a consistent width, and long panel rips where drift is most visible.
– TV cabinets, media units, bookshelves, and storage cabinets — repeat cuts for shelves and dividers.
– Drawer units, office furniture, and modular furniture — smaller repeat parts where one offset setting speeds up a whole build.
– Plywood and MDF breakdown work — turning full sheets into rough or finished dimensions before joinery.
– Router circle cutting — rounded cabinet corners, circular tabletops, speaker cutouts, and curved trim work on guides with a pivot attachment.
– DIY woodworking and professional workshops alike — scaling from a home hobbyist without a panel saw to a shop where repeatability across a full job matters most.
Buying Guide
Check blade-side compatibility. Circular saws have the blade mounted on either the left or right side of the motor, depending on brand and model. Some edge guides are built for one configuration only — confirm this before ordering, since it’s a common return reason.
Confirm router compatibility separately. Don’t assume every edge guide includes a router pivot attachment, and check whether your router’s base plate is compatible, since this varies by brand and model.
Match rail length to your typical job. For full sheets of plywood, you want a rail long enough to handle that in as few repositions as possible; for smaller furniture parts, a shorter, more portable rail may suit better.
Look at how the offset is read. A clear, easy-to-read scale saves time and reduces setup errors, especially if you’re constantly switching between cut widths.
Step-by-Step Installation Guide
Step 1: Attach the sub-base. Mount the guide’s base bracket to your circular saw or router per the manufacturer’s instructions, making sure it sits flush with no play.
Step 2: Measure your blade offset. With the saw unplugged, measure the distance from the base plate edge to the nearest face of the blade.
Step 3: Set the guide’s offset. Adjust the fence to the distance you want to cut from the material’s edge, accounting for the blade offset.
Step 4: Run a test cut on scrap. Cut an offcut of the same material first, measure the result, and adjust the offset if it’s off.
Step 5: Clamp or position the guide against the workpiece. Make sure the fence is seated firmly along its full length, not just at one point.
Step 6: Make the cut with steady, even feed. A fast, uneven push is more likely to bind the blade than the guide is to fail.
Step 7: Recheck before repeat cuts. For a batch of identical parts, check the first two or three against each other before committing to the full run.
Router Circle Cutting
This is where a Precision Edge Guide earns its keep beyond straight-line ripping, on models with a pivot attachment. The setup starts with a pilot hole marked at the center of the circle. A pivot pin sits in that hole and acts as the point the router arm rotates around, with the router mounted at a fixed radius set using the manufacturer’s adjustment scale.
Once set, the router moves in a controlled arc around the pivot, cutting a clean, consistent circle rather than the wandering line you’d get freehanding around a traced outline. Most operators make several shallow passes rather than one deep cut, especially in hardwood, to avoid overloading the bit or tearing the edge.
This is genuinely useful for rounded cabinet corners, circular tabletops, speaker cutouts, and curved trim details — work a circular saw alone can’t produce. It’s also one of the few situations where a mechanical jig clearly outperforms freehand routing, since matching two curved edges by eye is extremely hard to do consistently otherwise.
Common Mistakes
Ignoring the blade offset. The single most common error — guessing instead of measuring leads to cuts that are consistently too narrow or too wide.
Not clamping the guide securely. A guide that shifts mid-cut produces a curved or stepped edge, often two-thirds of the way through once the material starts to flex.
Using a dull or wrong blade and blaming the guide. The guide controls the line, not tear-out from a worn blade or the wrong tooth count for the material.
Rushing the feed rate. Pushing too fast can bog down or bind the saw, stressing the guide’s locking mechanism and pulling it out of alignment.
Not supporting the offcut. On long rips, an unsupported offcut can sag and pinch the blade near the end of the cut.
Maintenance
Keep the rail and fence clear of sawdust and resin buildup — both affect how smoothly the base slides and can throw off your offset over time. Check clamps and locking mechanisms periodically, since a loose lock is the most common cause of drift. Store the rail flat or hung straight rather than leaning against a wall, where it can develop a slight bow that’s hard to notice until cuts stop tracking true.
Safety Tips
Treat the saw or router as you normally would — this accessory doesn’t change the fundamentals. Keep hands well clear of the fence and pivot mechanism while running. Confirm the guide is fully clamped and seated before starting any cut. Never remove or bypass the blade guard to make room for the guide. Support both sides of long sheet cuts so the material doesn’t pinch or drop as you finish. Disconnect power before adjusting the offset or attachment.
Troubleshooting
Cut isn’t straight. Check clamp tightness and the rail for a bow before assuming the saw is at fault.
Cut width is inconsistent across a batch. Re-check the offset — it may have shifted, or the base plate connection loosened.
Router wanders during circle cuts. Check that the pivot pin is seated firmly with no play.
Rough or torn edges despite a straight line. Usually not the guide’s fault — check blade sharpness, tooth count, and feed speed first.
Precision Edge Guide vs Track Saw
A track saw is a dedicated saw built around its own rail system, often with anti-kickback features and a riving knife designed for that track. A Precision Edge Guide is an accessory added to a saw you already own. Track saws tend to give a cleaner edge on melamine and laminate, particularly models with a scoring function; an edge guide costs less and lets you use an existing saw, but won’t match a dedicated track saw’s finish on delicate laminate edges. Which makes sense depends on budget and how often you’re cutting sheet goods with a visible finished edge.
Precision Edge Guide vs Rip Fence
A rip fence usually comes attached to a table saw, or occasionally bundled with a circular saw for narrow shop cuts — typically shorter and built into the tool itself. A Precision Edge Guide is an aftermarket, standalone accessory, generally longer, designed to handle full-sheet rip cuts or attach to a router for straight-line and circle work a built-in rip fence was never designed for.
Precision Edge Guide vs Straight Edge Clamp
A basic straight edge clamp is just a clamped batten or rail — you calculate and mark the blade offset yourself, every time, with a tape measure. A Precision Edge Guide typically includes a repeatable offset adjustment built into the fence, so you’re not recalculating that distance on every job. That said, plenty of woodworkers still get good results from a shop-made straightedge; the guide’s real advantage is speed and repeatability, not that a clamped batten doesn’t work.
Frequently Asked Questions
Can a Precision Edge Guide replace a track saw?
For most sheet-breakdown work, yes. For finish-critical cuts on laminate or melamine, a track saw with a scoring function usually gives a cleaner result.
Does it work with any circular saw?
Not universally. Blade-side configuration and base plate shape both affect compatibility, so check the listing against your specific saw.
Can I use the same guide for both my circular saw and my router?
Some models support both; many don’t. Confirm router compatibility separately.
How do I cut a perfect circle with a router edge guide?
Using a pivot attachment: mark a center point, drill a pilot hole, set the pivot pin and radius, and rout in controlled passes around the pivot.
Will it work on curved or irregular material edges?
No — the fence needs a straight reference edge, either the material’s factory edge or a clamped straightedge.
What blade offset should I use?
Measure your saw’s actual offset from base plate edge to blade face, and set the guide accordingly rather than guessing.
Can beginners use it safely?
Yes, with the same care as any circular saw or router. The guide simplifies line-tracking but doesn’t remove the need for basic tool safety.
Does it work on laminate or melamine without chipping?
It helps by keeping the cut steady, but chip-out is mostly controlled by blade choice and, on show edges, a strip of tape along the cut line.
Do all edge guides include a router circle-cutting attachment?
No. Some are saw-only, so check before assuming this feature is included.
Is steel or aluminum construction better?
Neither is universally better — steel is more rigid over long spans, aluminum is lighter for portable use.
Final Verdict
A Precision Edge Guide isn’t a glamorous tool, but in a cabinet shop it solves a real, everyday problem: getting straight, repeatable cuts out of a handheld circular saw without measuring every panel by hand. It earns its place fastest on jobs with repeated identical parts — cabinet runs, wardrobe carcasses, shelving batches — where one accurate offset setting saves real time across a dozen or more cuts. On models with a router pivot attachment, it also opens up clean circle cutting that’s hard to match freehand. It won’t outperform a dedicated track saw on delicate laminate finish work, and it won’t fix a dull blade or poor technique. Used for what it’s built for, it’s a solid, practical accessory rather than a miracle fix.
Affiliate Disclosure
As an Amazon Associate, TOOLSCRAFTERS earns from qualifying purchases. This does not affect the price you pay and helps support our work in creating detailed woodworking guides, buying advice, and practical information for carpenters, furniture manufacturers, cabinet makers, and DIY enthusiasts. Our editorial opinions are independent and are not influenced by affiliate partnerships.
About the Author
Md Vajeed is the founder of TOOLSCRAFTERS and writes about woodworking tools, power tools, furniture hardware, cabinet-making accessories, and workshop equipment. His buying guides help carpenters, cabinet installers, furniture manufacturers, and DIY woodworkers choose practical tools and hardware through detailed product research, industry knowledge, and real-world woodworking applications.