
What is a Woodworking Right Angle Clamp?
Introduction
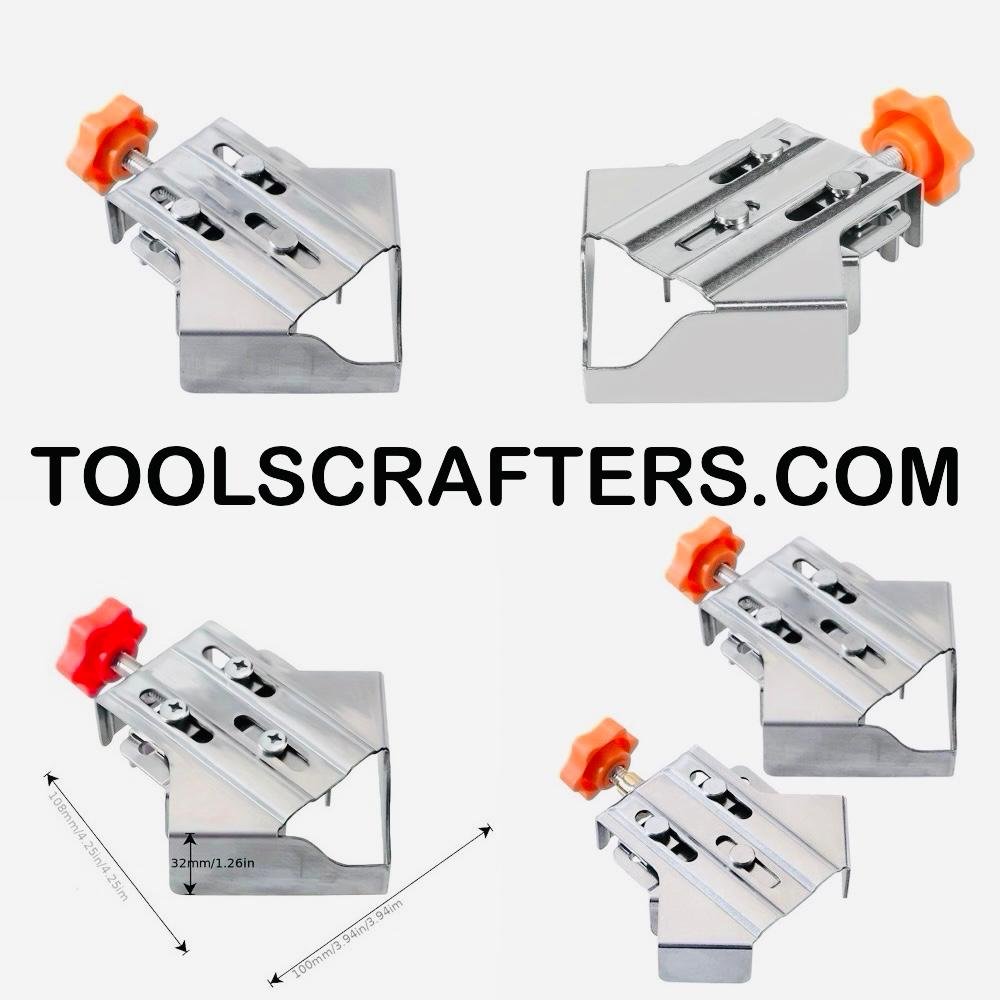
A woodworking right angle clamp — sometimes called a cabinet assembly clamp, corner clamp for woodworking, or 90 degree clamp — is a jig-style clamping tool built specifically for joining cabinet panels at a square corner. It’s not a general-purpose clamp you reach for on random jobs. It exists for one reason: to hold two flat panels perpendicular to each other while you fasten them.
This matters because cabinet carcasses are built from flat panels joined at 90-degree corners — sides, tops, bottoms, and shelves. Getting that angle right, consistently, across every joint, is what separates a cabinet that closes properly from one that racks and binds. The right angle clamp exists to make that consistency easier to achieve without a helper standing there holding boards.
It’s worth being clear about what this tool is not, because the name “corner clamp” gets used loosely online. This is not a welding corner clamp built for metal fabrication, not a pipe clamp, not a bar clamp, and not a bench vise. Those tools solve different problems in different trades. This one is built around wood panel thicknesses and cabinet joinery, full stop.
How It Works
The mechanics are straightforward. The clamp has two registration faces set at a fixed right angle. You seat one panel against one face and the second panel against the other. Once both panels are sitting flush, you tighten the clamp — depending on the model, that might be a screw mechanism, a lever/toggle action, or a quick-trigger clamp — and the joint locks into a 90-degree position.
From there, both of your hands are free. That’s the entire point. Instead of holding a panel plumb with one arm while trying to drill and drive a screw with the other, you’re working with both hands on the tool, and the clamp is doing the job a second person used to do.
Most cabinet makers use more than one clamp per carcass, positioning them at different corners as they build the box up. That lets you square, drill, and fasten one joint, then move to the next without losing your grip on the whole assembly.
Why Cabinet Makers Use It
The honest answer is labor. On a job site or in a small shop, you don’t always have a second person available, and paying someone to stand there holding a panel for twenty minutes isn’t a good use of their time or your budget. A right angle clamp replaces that second pair of hands.
It also changes the pace of a build. When you’re not stopping every few minutes to reposition a panel that’s slipped, or re-checking a corner that shifted while you were reaching for the drill, you move through a carcass faster. In a production environment building multiple identical cabinets, that adds up across the day.
There’s a quality angle too. A panel held by hand tends to move slightly — not much, but enough to throw off a corner by a degree or two. Over several joints, that small drift compounds into a carcass that’s noticeably out of square. A clamp holding the joint mechanically doesn’t drift the way a tired arm does.
Key Features
Since specifications vary significantly between manufacturers, this section covers what to look for conceptually rather than claiming universal numbers.
Clamping Mechanism
Right angle clamps come with different tightening systems — screw-type, lever/toggle-type, and quick-trigger types are all common on the market. Each has a different feel and a different speed of use, and the right one depends on how often you’re clamping and unclamping through a workday.
Registration Faces
The two faces that the panels sit against are what actually establishes the angle. Some clamps have open corners that leave more room for driving fasteners close to the joint; others enclose the corner more fully for a firmer hold. Which one suits you depends on how you fasten — screws, confirmats, or cam-and-dowel hardware.
Panel Thickness Range
Every clamp accepts a certain range of panel thicknesses, and this varies by manufacturer and model. Always check this against the actual material you’re working with — standard cabinet-grade plywood, MDF, and particle board don’t all come in the same thickness, and a clamp that’s too tight or too loose on your panel won’t hold properly.
Body Material
You’ll find clamps built from metal, reinforced plastic, or a mix of both. Metal-bodied clamps tend to hold up better under daily production use; lighter-bodied clamps are often fine for occasional or DIY work.
Advantages
Perfect 90-degree alignment. The clamp’s whole job is holding that angle true while you work, which is harder to guarantee by hand.
Saves assembly time. Less repositioning, less re-checking, less waiting for a helper to be free.
One-person cabinet assembly. This is the advantage most installers and small-shop owners care about most. You don’t need to schedule a second person just to build boxes.
Reduces the need for a helper. Directly tied to labor cost — on residential jobs especially, a helper isn’t always in the budget for something as simple as holding a panel.
Improves cabinet accuracy. Fewer out-of-square corners means less trimming, less shimming, and fewer callbacks.
Holds panels steady while drilling and screwing. This is where most of the actual mistakes happen without a clamp — the panel shifts right as the screw bites.
Speeds up modular furniture production. In batch work, repeatable squareness across many identical units matters more than it does on a one-off build.
Works across common cabinet materials. Plywood, MDF, particle board, and solid wood are all standard carcass materials, and this tool is built to handle all of them.
Common Applications
Kitchen cabinets — base and wall units both rely on square corners for doors and drawers to sit correctly.
Wardrobes — tall side panels are genuinely hard to hold plumb by hand, which makes this one of the clearest use cases.
TV cabinets — low, wide units where the working angle is awkward for one person alone.
Bookcases — repetitive shelf-to-side joints benefit from a tool that keeps the process consistent joint after joint.
Storage cabinets — garage, laundry, and utility cabinets built in volume.
Office furniture — desks with modesty panels, pedestal units, and filing cabinet carcasses all use the same 90-degree joinery logic.
Drawer cabinets — smaller-scale, but the same alignment problem on a tighter footprint.
Display cabinets — visible joints raise the stakes on squareness, since any gap or misalignment shows.
Modular furniture — flat-pack and production-line assembly where speed per unit is the whole game.
Compatible Materials
– Plywood — the most common carcass material in professional cabinet making.
– MDF — widely used in painted cabinet lines and flat-pack furniture.
– Particle board / chipboard — common in budget and modular furniture, frequently melamine-faced.
– Solid wood — used in higher-end or custom cabinetry.
One practical note: melamine or laminate-faced boards mark more easily than raw plywood. If you’re working with faced material, it’s worth using a pad or scrap caul between the clamp and the panel surface.
Buying Guide
Match the Clamp to Your Panel Thickness
Check the accepted thickness range against what you actually build with. This varies by manufacturer, so don’t assume one model fits every carcass material you use.
Consider How Many You Actually Need
One clamp holds one corner. Most carcasses have four or more corners, and efficient one-person assembly usually means having enough clamps to work multiple joints without constantly moving a single unit around. Buying just one is a common way to undercut the whole point of the tool.
Think About Use Frequency
Daily production work justifies spending more on a durable, metal-bodied clamp with a mechanism built for repeated tightening and release. Occasional DIY use doesn’t need the same build quality.
Check the Corner Design
An enclosed corner gives a firmer hold; an open corner gives you more room to drive fasteners close to the joint. Consider how you actually fasten your panels before choosing.
Consider Portability
If you’re an installer moving between job sites, weight and how easily the clamps pack into a tool bag matters more than it would for a fixed-shop clamp that never leaves the bench.
Don't Assume All "Corner Clamps" Are the Same Product
Search results for “corner clamp” mix woodworking tools with welding and metal fabrication clamps. They are not interchangeable, and buying the wrong category means buying a tool that won’t fit your panels correctly or protect your surfaces.
Step-by-Step Installation Guide
1. Confirm your panels are cut square before you clamp anything. A clamp holds an angle — it doesn’t fix a bad cut.
2. Dry-fit the joint without fasteners to check that everything lines up as expected.
3. Set the base panel on a stable, flat surface — bench or floor, properly supported.
4. Bring the second panel into position at the joint line.
5. Seat the clamp at the corner, making sure both panels sit fully flush against the registration faces before you tighten anything.
6. Tighten gradually. Once it’s snug, re-check squareness — don’t just trust the clamp’s geometry blindly, especially on the first joint of a new build.
7. Pre-drill pilot holes, particularly in MDF and particle board, which split more easily than plywood.
8. Drive your fasteners while the clamp holds the joint steady.
9. Move to the next corner, and once several joints are done, check diagonals across the whole carcass to confirm the entire box is square — not just each corner in isolation.
10. Release the clamp only once the joint is mechanically fastened and can support itself.
Common Installation Mistakes
Trusting the clamp alone for overall squareness. A clamp holds one corner true. It says nothing about whether the whole carcass is square — that requires measuring diagonals across the finished box.
Skipping pilot holes. MDF and particle board split more readily than plywood, and skipping this step is one of the fastest ways to ruin a panel edge.
Over-tightening. Cranking the clamp down harder than needed can dent or mark the panel, especially on melamine-faced material.
Not supporting large panels independently. On tall or wide panels, the panel’s own weight can rack the joint before fastening is complete if it isn’t otherwise supported.
Using only one clamp on a large panel. The unclamped end can flex or twist while you’re working the fastened end.
Fastening too close to the clamp body. Watch your driver clearance so you’re not fighting the clamp itself while driving a screw.
Skipping the dry fit. Finding a fit problem after the clamp is tightened and screws are partially driven costs more time than checking beforehand would have.
Common Buying Mistakes
Buying only one clamp. Most real jobs need several to work efficiently, especially for solo assembly.
Ignoring the panel thickness range. A clamp that doesn’t match your material thickness won’t seat or hold properly.
Choosing on price alone for daily production use. A mechanism that wears out after light use costs more in downtime than the money saved upfront.
Not checking corner design against your fastening method. Discovering the clamp blocks your screw access after you’ve already bought it is avoidable with a quick check beforehand.
Overbuying for occasional use. Production-grade features cost more and aren’t necessary if you’re only assembling the odd cabinet at home.
Confusing this with a welding or metal fabrication corner clamp. They’re sold under similar names but built for entirely different materials and tolerances.
Maintenance Tips
Keep the tightening mechanism free of sawdust and dried glue — buildup here is the most common reason a clamp stops closing smoothly. Wipe down the registration faces regularly, since dried glue squeeze-out can create small bumps that throw off squareness on your next joint. Store clamps somewhere they won’t get knocked around or dropped, particularly if the body is cast or molded. On clamps that see daily use, check the moving parts — threads, levers, springs — periodically for wear. And if you’re working with laminate or melamine panels, keep a set of protective pads or scrap cauls on hand and use them consistently.
Safety Tips
Keep fingers clear of the tightening mechanism, especially on lever or toggle-style clamps that close with some speed. Make sure the panel and clamp are sitting stable on your work surface before you start drilling — an unstable setup can shift under drill pressure. Wear eye protection when pre-drilling and driving fasteners, as always. Don’t over-tighten past what’s needed to hold the joint steady; it stresses both the panel and the clamp for no real benefit. Be aware of pinch points when releasing a loaded clamp, particularly spring-loaded types. And even when working solo, make sure large panels are supported so nothing falls once you release the clamp.
Troubleshooting
Joint isn’t square even though the clamp is on. Check that both panels are fully seated against the registration faces, and double-check that the panels themselves were cut square to begin with.
Clamp won’t tighten fully. Look for sawdust or dried glue in the mechanism, and confirm your panel thickness falls within the clamp’s intended range.
Marks or dents appearing on the panel surface. Add a protective pad, and back off how hard you’re tightening — most joints don’t need maximum force to hold steady.
Clamp slips while drilling. Re-seat and re-tighten before you start, and check that your work surface itself isn’t causing movement.
Mechanism feels loose over time. Some wear on threads or levers is normal after heavy daily use. At a certain point, it’s a replacement item rather than something to keep working around.
Clamp is blocking screw placement. Reposition slightly for the current job, and factor corner design into your next purchase.
Woodworking Right Angle Clamp vs C Clamp
A C-clamp applies point pressure between a fixed frame and a screw — it’s a general-purpose tool built for a huge range of jobs, none of them specifically about establishing a right angle. It can add extra hold on a large panel, but it does nothing on its own to keep two panels perpendicular. A **right angle clamp** is purpose-built for that one job — holding the angle — which a C-clamp was never designed to do.
Woodworking Right Angle Clamp vs Bar Clamp
Bar clamps apply pressure along a single axis between two flat jaws. They’re the right tool for face gluing, panel lamination, or edge banding — anywhere you need even pressure across a flat surface. They don’t establish or hold squareness by themselves. Some shops actually use a bar clamp and a right angle clamp together — the bar clamp adding pressure or support, the right angle clamp holding the corner true. But they solve different problems, and one doesn’t replace the other.
Woodworking Right Angle Clamp vs Welding Corner Clamp
This comparison matters because the search term “corner clamp” gets used for both, and they are not the same tool. Welding corner clamps are built from heavy steel, designed to hold metal stock in place for tack-welding, and made to handle heat exposure that has nothing to do with woodworking. Their contact surfaces aren’t designed to protect a finished wood or laminate panel — using one on cabinet material risks marking or crushing the surface, and it likely won’t fit standard panel thicknesses correctly anyway. A woodworking corner clamp is sized and built around cabinet panels specifically. If you’re buying for furniture or cabinet work, make sure the listing is actually for a woodworking tool and not a metal fabrication clamp wearing a similar name.
Frequently Asked Questions
Can one person really assemble a cabinet alone with this clamp?
Yes — that’s the primary reason cabinet makers and installers use it. It replaces the second person who would otherwise be holding the panel steady.
What materials can I clamp with it?
Plywood, MDF, particle board, and solid wood are all standard carcass materials this tool is designed to work with.
Do I need more than one clamp per cabinet?
Most builders use more than one, since a typical carcass has several corners to hold and fasten as you go.
Does the clamp replace screws or fasteners?
No. It holds the joint steady during assembly; the screws, confirmats, or dowels are what hold the joint permanently once the clamp comes off.
Can it be used for drawer boxes, not just full cabinets?
Yes, the same 90-degree alignment problem applies at a smaller scale.
Will it mark melamine or laminate surfaces?
It can if you tighten too aggressively or skip a protective pad. Using a scrap caul or pad between the clamp and a faced panel avoids this.
What’s the real difference between this and a welding corner clamp?
A welding corner clamp is built for metal fabrication and tack-welding. This clamp is sized and built specifically for wood panel thicknesses used in cabinet making.
Can it be used on-site, not just in a shop?
Yes — many installers carry these to job sites specifically because they don’t always have a second person available on-site.
Does it work for both flat-pack and site-built cabinets?
Yes, the underlying joint — two panels meeting at 90 degrees — is the same in both cases.
How do I confirm a joint is actually square, beyond trusting the clamp?
Measure diagonals across the finished carcass. If both diagonal measurements match, the box is square; the clamp holds one corner, but the diagonal check confirms the whole assembly.
Final Verdict
A woodworking right angle clamp isn’t a flashy tool, and it won’t show up in a highlight reel. What it does is remove one of the most common bottlenecks in cabinet assembly — needing a second person just to hold a panel steady. For a solo installer, a small shop owner, or a production line building modular furniture in volume, that’s a real, practical advantage that shows up in every carcass you build. It won’t fix a badly cut panel, and it’s not meant to replace proper fastening or a final squareness check with diagonals — but for holding two panels true while you work, it’s built exactly for that job. Since specifications, mechanisms, and thickness ranges vary between manufacturers, the right move is always to check the specific model against the materials and volume of work in your own shop before buying.
Affiliate Disclosure
As an Amazon Associate, TOOLSCRAFTERS earns from qualifying purchases. This does not affect the price you pay and helps support our work in creating detailed woodworking guides, buying advice, and practical information for carpenters, furniture manufacturers, cabinet makers, and DIY enthusiasts. editorial opinions are our own.
About the Author
Md Vajeed is the founder of TOOLSCRAFTERS and writes about woodworking tools, furniture hardware, cabinet-making accessories, and workshop equipment. His buying guides help carpenters, cabinet installers, furniture manufacturers, and DIY woodworkers choose practical tools through detailed product research and industry knowledge.