
cabinet hinge drill guide
Introduction
Ask anyone who has hung a run of kitchen cabinet doors what keeps them up at night, and a fair number will say the same thing: hinge placement. Not the wood selection, not the finish, not even the hardware brand. It’s the two little cup holes and the pilot holes that go with them. Get those wrong on a $180 prefinished door and you’ve turned a nice piece of material into scrap.
A cabinet hinge drill guide tool set exists to solve exactly that problem. It’s a jig — nothing more dramatic than that — built specifically to help you bore the concealed hinge cup hole and the mounting pilot holes in the same spot, at the same depth, door after door, without re-measuring each one from scratch.
This isn’t a shelf pin jig, a pocket hole jig, a dowel jig, or a drawer slide jig. Those solve different problems entirely. This is strictly about getting concealed (European-style) hinges into cabinet doors accurately and repeatably. If that’s the job in front of you, here’s what you actually need to know before you buy one, set one up, or hand one to an apprentice.
What Is a Cabinet Hinge Drill Guide Tool Set?
At its core, this tool set is built around one job: locating and boring the hinge cup recess — typically referencing the 35mm cup diameter common to most concealed hinge systems — along with the two smaller pilot holes for the mounting plate screws.
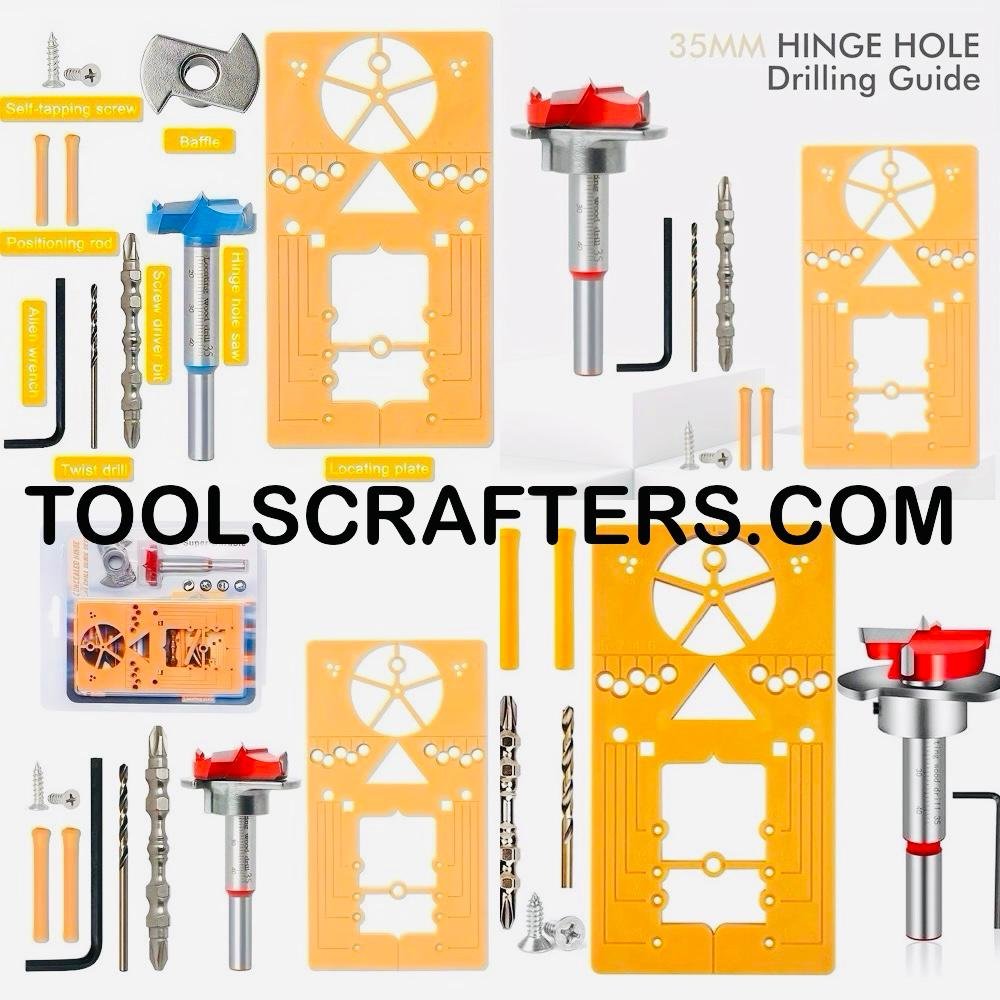
A typical set includes the jig body itself, which registers against the door edge or face, a drill bit sized to match the hinge cup, and in some kits, a separate hole saw for the cup bore. Fences, stops, or adjustable collars let you dial in the door thickness and the distance from the door edge.
It’s worth being blunt about what it isn’t. It won’t drill shelf pin holes for adjustable shelving. It won’t cut angled pocket holes for face-frame joinery. It won’t align dowels for edge-to-edge glue-ups. If a supplier’s listing photo shows rows of small evenly spaced holes down a cabinet side panel, that’s a shelf pin jig, not this tool.
How It Works
The mechanics are straightforward, which is part of the appeal. You set the jig’s stop to the correct setback distance from the door edge — this comes from the hinge manufacturer’s spec for the hinge you’re using, not from the jig itself, since that number changes hinge to hinge. You clamp or register the jig against the door.
From there, the guide bushing controls where the bit can travel, and a depth stop or collar controls how deep it goes. You drill the cup hole first, then move to the pilot hole guides for the mounting plate screws. Once that first hole checks out with a test hinge, you don’t touch the settings again — you just repeat the same motion on every remaining door in the batch.
That last part is the whole point. The jig isn’t smarter than you. It’s just consistent in a way that a tape measure and a pencil mark can never quite match after the fifteenth door.
Why Cabinet Makers Use It
Here’s the honest answer: measuring every door by hand works fine until you have more than two or three of them. On a full kitchen run — fifteen doors, twenty doors, sometimes more — manual measuring means marking, checking, drilling, and re-checking on every single piece. Small errors don’t stay small. A half-millimeter drift on door three becomes a full millimeter by door ten, and now the hinge line across the bank of cabinets isn’t straight anymore.
A jig removes that drift. You set it once, verify it once, and then the physical stop does the repeating for you instead of your eye and your tape measure. That’s not a small convenience — it’s the difference between a kitchen where every door hangs level and one where two or three doors are visibly a hair off, which customers notice even if they can’t say why.
There’s also the damage question. A hinge cup drilled too deep can blow through the front face of a thin door. One drilled in the wrong spot on a laminate or veneered panel isn’t something you sand out — it’s a replacement door, and on a nice job that’s real money and real time lost. A guide reduces the chance of that mistake by taking the guesswork out of positioning and depth.
Why Consistent Hinge Placement Matters
Cabinet doors read as a set. If you’re standing in a kitchen looking at eight upper cabinet doors side by side, your eye catches inconsistency in the hinge line before you’d ever consciously notice a hinge is off by a couple millimeters. It just looks “not quite right,” and that impression sticks with a homeowner far longer than they’d remember a perfectly executed detail.
Consistent placement also affects function, not just looks. A hinge mounted slightly off can bind, cause a door to hang crooked against its neighbor, or throw off the reveal gaps that make a cabinet run look intentional rather than assembled in a hurry. When every door in a run shares the same hinge position, adjustment at install time is minimal — you’re fine-tuning, not fighting each door individually.
For a shop running production work, this repeatability is really the product. It’s what separates a batch of doors that go together in an afternoon from one that eats your whole day in adjustments.
Key Features
Most sets on the market share a similar core structure, though exact specs vary by manufacturer:
Hinge Cup Jig Body
The main housing that locates the hole position relative to the door edge, generally built around the 35mm hinge cup standard used by most European-style concealed hinges.
Guide Bushings and Matched Drill Bit
A bit sized to the jig’s bushing, intended to produce a clean cup hole without wandering — bit sizing should match the hinge cup diameter you’re actually using.
Depth Stop or Collar
Controls how deep the cup hole goes, which matters more than almost anything else in this process since too deep means blowthrough and too shallow means the hinge won’t seat correctly.
Adjustable Fence for Door Thickness
Lets the same jig handle a range of door thicknesses — the actual adjustment range depends on the specific model, so check that against your typical stock before buying.
Optional Hole Saw Cutter
Some kits include a hole saw as an alternative or supplement to the dedicated bit, useful when boring particularly hard material or when you need a slightly different approach than the standard bit allows.
Standard 35mm Hinge Bit vs Adjustable 35mm Hinge Hole Bit
- Standard 35mm Hinge Bit
- Simple design
- Low cost
- Manual depth control
- Good for occasional woodworking
- 35mm Adjustable Hinge Hole Bit
- Includes depth stop collar
- Consistent drilling depth
- Better for cabinet production
- Reduces over-drilling risk
Table:
| Feature | Standard 35mm Hinge Bit | Adjustable 35mm Hinge Hole Bit |
|---|---|---|
| Hole Diameter | 35mm | 35mm |
| Depth Control | Manual | Adjustable Stop Collar |
| Best For | DIY & occasional work | Professional cabinet work |
| Consistency | Good | Excellent |
| Risk of Over-Drilling | Higher | Lower |
Compatible Materials
These jigs are generally used across plywood, MDF, particle board, laminate-faced board, hardwood, and solid wood cabinet doors. In practice, the material affects your technique more than it affects whether the jig works.
MDF and particle board are more prone to blowout on the exit side if you don’t back them up properly or if your bit has gone dull. Laminate faces can chip at the entry point without a sharp bit and a controlled feed rate. Hardwood needs a bit more attention to bit speed to avoid heat buildup and burning at the cup edges. None of this is a knock against using the jig on these materials — it’s just workshop reality that the jig controls position and depth, but you still control feed rate, bit condition, and backing support.
Common Applications
This tool shows up constantly in:
– Kitchen cabinet doors, far and away the most common use case given typical door counts per job
– Wardrobe and closet doors
– TV and media cabinet doors
– Storage cabinet doors
– Bathroom vanity doors
– Office furniture with concealed hinge doors
– Modular furniture production
– Furniture manufacturing runs
– DIY home renovation projects
– Professional cabinet shops running batch production
Buying Guide
A few things actually worth checking before you buy, rather than specs that sound impressive but don’t matter for your work:
Build quality of the jig body. Metal-bodied jigs generally hold their settings better over repeated use than lighter plastic ones, though a well-made plastic jig can still serve a smaller shop or occasional DIYer fine.
Bit compatibility. Confirm the included bit actually matches the hinge cup size you’ll be using — this depends on your hinge system, not just the jig, so check both before ordering.
Adjustment range. If your shop works across a range of door thicknesses, make sure the jig’s adjustment range actually covers what you build — this varies significantly between models.
Depth stop reliability. A depth stop that loosens or drifts under repeated use is worse than not having one, since it gives false confidence. Look for a stop mechanism that locks down securely.
Clamping or registration method. Some jigs clamp to the door edge, others register against a face reference. Think about which matches how you actually hold and position doors in your workflow.
Because exact tolerances, adjustment ranges, and bit sizing differ between manufacturers, always cross-check the jig against the specific hinge brand and door thickness you plan to use it on rather than assuming universal compatibility.
Step-by-Step Installation Guide
Step 1: Confirm Your Hinge Specs
Check the setback distance and cup diameter required by the hinge system you’re installing — this comes from the hinge manufacturer, and it varies by hinge model, so don’t assume it matches a previous job.
Step 2: Mark Your Reference
Establish a reference edge or line on the door, even if you’re using the jig’s registration to do most of the work. A quick pencil mark as a sanity check costs you nothing.
Step 3: Set the Jig
Adjust the fence, stop, and depth collar to match the setback and depth you need. Lock everything down firmly.
Step 4: Secure the Jig to the Door
Clamp or register the jig against the door edge exactly where the hinge is meant to go.
Step 5: Drill the Cup Hole
Drill at a controlled, steady speed, letting the depth stop do its job rather than forcing the bit.
Step 6: Drill the Pilot Holes
Move to the pilot hole guides and drill the mounting plate screw holes through the jig’s bushings.
Step 7: Test Fit
Before committing to the rest of the batch, mount an actual hinge in the first door and check the fit and depth.
Step 8: Repeat Across the Batch
Once you’ve confirmed the first door is correct, run the same settings across every remaining door without re-measuring.
Common Mistakes
– Skipping the test fit and drilling the entire batch before confirming depth and position are correct
– Letting the depth stop drift loose partway through a run
– Inconsistent clamping pressure, which lets the jig shift slightly between doors
– Using a dull bit, which increases tear-out and forces you to push harder, increasing the chance of blowthrough
– Not supporting the door properly on the exit side, especially with MDF or particle board
– Ignoring the specific setback distance required by the hinge brand in use and assuming a generic number
– Rushing through laminate or veneered doors without slowing the feed rate
Maintenance
Clamp the workpiece securely before drilling — never rely on hand pressure alone to hold a door in place. Wear eye protection, since boring hinge cups produces a fair amount of chip-out, especially in MDF. Keep your hands well clear of the bit path at all times. Match your drill speed to the material — hardwood and laminate generally want a slower, more controlled speed than softer plywood. Unplug or disconnect the drill before making any adjustment to the jig itself. If you’re using a hole saw attachment, be aware these carry more kickback risk than a standard bit, so keep a firm two-handed grip.
Troubleshooting
Hinge sits too shallow or too deep — check your depth stop setting before assuming the jig itself is faulty.
Hinge alignment shifts between doors — check whether the jig has slipped out of its clamped position, or whether the fence has loosened.
Tear-out on the exit side of the hole — add a backing board behind the door, slow your feed rate, and check bit sharpness.
Jig won’t seat square against the door — clear sawdust from the registration points and check the clamp for wear.
Hole diameter feels slightly off — confirm the bit actually matches the bushing size the jig was designed for; mismatched bits are a common and easily overlooked cause.
Cabinet Hinge Drill Guide vs Freehand Drilling
Freehand drilling relies entirely on your eye, your measuring, and your steadiness of hand — repeated for every single door. It works, and plenty of skilled installers do it, but the error risk climbs with every additional door in the run, and there’s no fixed reference to fall back on if you get interrupted mid-job.
A hinge jig trades a small amount of setup time for a fixed, repeatable reference that holds steady across the whole batch. On a one-off repair or a single replacement door, freehand might genuinely be faster since setting up a jig for one hole isn’t worth the trouble. On any run of multiple doors, though, the jig starts paying for itself almost immediately in both speed and reduced mistakes.
Cabinet Hinge Drill Guide vs Paper Template
Paper or cardboard hinge templates are cheap, and for an occasional single-door job they can work well enough. The problem is durability under repeated use — paper stretches, tears at the registration points, and can shift slightly each time you reposition it, none of which you’ll necessarily notice until the doors are hung and something looks off.
A physical jig doesn’t have that problem. It holds its shape and its settings across dozens of uses, and it controls drilling depth in a way a flat paper template simply can’t. For a single project on a tight budget, a template might get the job done. For anything resembling regular cabinet work, a proper jig is the more reliable tool.
Cabinet Hinge Drill Guide vs CNC Production
CNC line-boring machines are the standard in larger cabinet factories, and for good reason — once programmed, they repeat with no manual setup required per door and can run through high volumes with minimal operator involvement. That said, the equipment cost and shop footprint put CNC well out of reach for smaller shops, independent cabinet makers, and DIY builders.
A manual hinge drill guide is the realistic, portable, low-cost alternative for that entire segment of the market. It won’t match a CNC’s raw throughput on a hundred-door commercial order, but for a typical residential kitchen, a wardrobe run, or custom furniture work, it delivers consistent results without the capital investment a CNC setup demands.
Frequently Asked Questions
What size hole does a cabinet hinge drill guide cut?
Most concealed hinge systems use a 35mm cup, and most jigs are built around that standard, but always confirm against your specific hinge brand before drilling.
Can one jig work with different hinge brands?
It depends on the jig and whether its bushing size matches the cup diameter of the hinge you’re using — check compatibility before assuming.
What door thicknesses can these jigs handle?
This varies by model. Check the manufacturer’s adjustment range against the actual stock thickness you build with.
Do I need a special drill bit for this jig?
Many sets include a matched bit, and some allow use of a standard hole saw as an alternative — check what’s included and whether it fits the hinge you’re installing.
Is this the same as a shelf pin jig?
No. Shelf pin jigs drill rows of small holes for adjustable shelving. This jig is specifically for concealed hinge cup and pilot holes.
Can I use this on doors that are already hung?
It’s generally intended for doors off the cabinet, before hanging, since clamping and registration are easier on a flat, unmounted door.
Will it work on MDF and laminate doors?
Yes, though these materials are more prone to tear-out, so a sharp bit and proper backing support matter more here than on solid wood.
How much faster is this than measuring manually?
On a single door, the difference is minor. Across a multi-door batch, the time savings from not re-measuring each one adds up significantly.
Can a beginner get professional results with this tool?
That’s a big part of its appeal — the jig handles positioning and depth, which reduces reliance on the installer’s own measuring precision.
What’s the biggest risk if I skip using a jig?
Cumulative measuring drift across multiple doors, and the potential for a mis-drilled hole to ruin an otherwise good door, especially on prefinished or veneered material.
Final Verdict
For anyone hanging more than a couple of cabinet doors at a time, a cabinet hinge drill guide tool set earns its place in the shop fairly quickly. It doesn’t replace good judgment about setback distances or material handling, and it won’t match a CNC’s output on a large commercial order. What it does is take the repeated measuring out of a job where repeated measuring is exactly where mistakes creep in. Set it once, check it once, and let it carry that same accuracy through the rest of the batch — that’s the whole value proposition, and for most cabinet work, it holds up.
Affiliate Disclosure
As an Amazon Associate, TOOLSCRAFTERS earns from qualifying purchases. This does not affect the price you pay and helps support our work in creating detailed woodworking guides, buying advice, and practical information for carpenters, furniture manufacturers, cabinet makers, and DIY enthusiasts. Our editorial opinions are independent and are not influenced by affiliate partnerships.
About the Author
Md Vajeed is the founder of TOOLSCRAFTERS and writes about woodworking tools, power tools, furniture hardware, cabinet-making accessories, and workshop equipment. His buying guides help carpenters, cabinet installers, furniture manufacturers, and DIY woodworkers choose practical tools and hardware through detailed product research, industry knowledge, and real-world woodworking applications.