
13 Essential Router Bits Every Woodworker Should Know (Complete Guide)

If you’ve spent any real time behind a router table, you already know that the bit does the talking — not the router. I’ve been running routers in a working cabinet shop for over two decades, and the difference between a clean, glue-ready joint and a burned, chipped-out mess almost always comes down to picking the right bit and running it the right way. Below is my working reference for thirteen router bits I reach for constantly, broken down the way I’d explain them to an apprentice standing next to me at the table.
Quick Router Bit Comparison Table
| Router Bit | Primary Use | Best For | Skill Level |
|---|---|---|---|
| Flush Trim Router Bit Set (Top Bearing) | Flush trimming, template routing | Laminate, edge banding, pattern work | Beginner |
| Double Bearing Flush Trim Router Bit | Dual-sided template routing | Curved furniture parts, cabinet components | Intermediate |
| Round Over Router Bit | Rounding sharp edges | Tabletops, shelves, countertops | Beginner |
| 45° Chamfer Router Bit | Creating beveled edges | Decorative panels, cabinet doors, boxes | Beginner |
| Tongue & Groove Router Bit Set | Edge-to-edge joinery | Tabletops, paneling, flooring | Intermediate |
| Lock Miter Router Bit (45° Lock Miter) | Interlocking 45° corner joints | Cabinets, drawers, boxes, columns | Advanced |
| Finger Joint Router Bit | Box and finger joints | Drawer boxes, storage boxes, furniture joinery | Intermediate |
| Bowl & Tray Router Bit | Hollowing wood | Serving trays, bowls, decorative dishes | Intermediate |
| Door & Window Casing Router Bit | Decorative molding profiles | Door trim, window casing, furniture frames | Advanced |
| Roman Ogee Router Bit | Decorative edge profiling | Furniture, shelves, cabinet tops | Beginner |
| Rule Joint Router Bit (Drop Leaf Table Bit) | Drop-leaf table joints | Folding tables, gateleg tables | Advanced |
| Frame Molding Router Bit | Decorative frame molding | Picture frames, mirror frames, cabinet doors | Intermediate |
| Round Nose (Core Box) Router Bit | Grooves, flutes, finger pulls | Sign making, decorative channels, cabinet pulls | Beginner |
Why This Table Matters
Choosing the right router bit before starting a project saves time, improves cut quality, and reduces the risk of burning, tear-out, or wasted material. This quick comparison table gives you an at-a-glance overview of what each router bit is designed for, where it performs best, and the skill level required to use it effectively. Whether you’re a beginner building your first cabinet or an experienced woodworker producing custom furniture, this reference will help you select the most suitable bit before turning on the router.
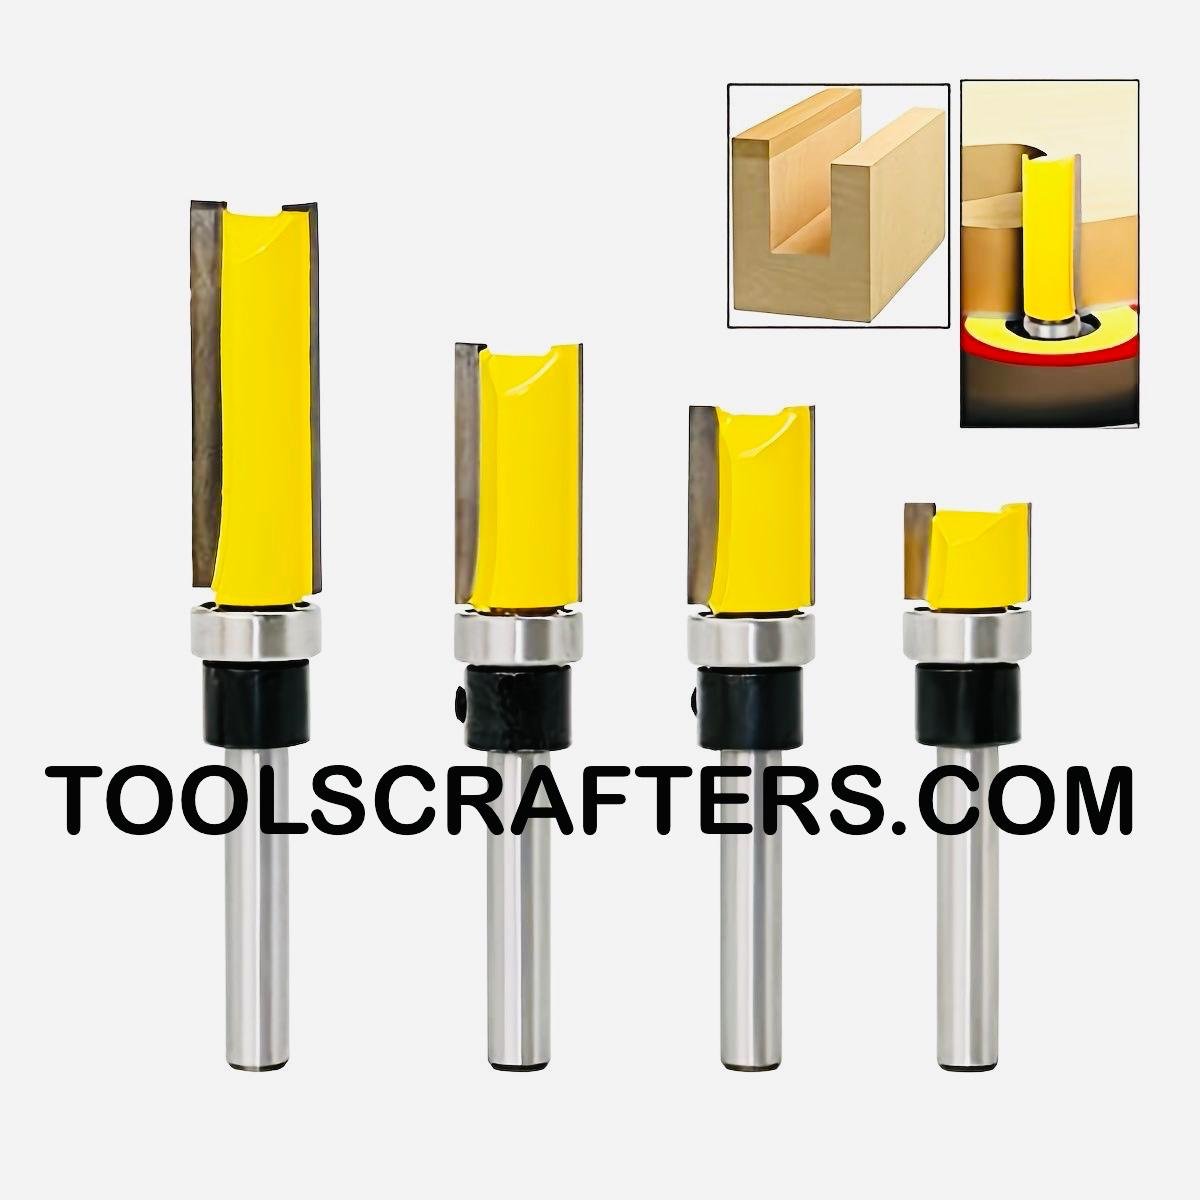
Flush Trim Router Bit Set (Top Bearing)
What is this Router Bit?
This is a four-piece flush trim set — straight, double-flute carbide bits with a bearing mounted directly above the cutting edge, on the shank end. Each bit in the set is a different length and diameter, so you can match the bit to the thickness of the material you’re trimming.
How does it work?
The top-mounted bearing rides along a template, pattern, or the edge of a substrate that’s already the correct size, and the carbide flutes below it shave the workpiece flush to match. Because the bearing sits above the cutters, the bit is guided from the top face of the stack.
Primary Uses
Trimming laminate and edge banding flush to plywood or MDF, template/pattern routing for repeat parts, and flushing solid wood edging to a case side.
Furniture Applications
Flushing edge banding on tabletops, trimming solid-wood lipping on plywood shelves, and pattern-routing curved chair parts or apron cutouts using a master template.
Cabinet Applications
Trimming plastic laminate on countertops and cabinet ends, flush-trimming veneer edge tape before sanding, and batch-cutting identical door parts off a template in production runs.
Advantages
Leaves a clean, splinter-free edge with almost no sanding needed; the bearing prevents the bit from cutting into the base material; having four sizes means you’re covered for thin edge banding all the way up to thicker solid stock.
Limitations
The bearing can burnish or burn softer woods if you pause too long in one spot; it only cuts as accurately as the template or substrate edge it’s following, so a rough template gives a rough part.
Compatible Router Types
Works in a handheld router with an edge guide or freehand along a template, and performs well mounted in a router table for repeat production work.
Best Wood Types
Birch and Baltic birch plywood, maple, cherry, and any tight-grained hardwood edge banding; avoid pushing it hard through resinous softwoods, which tend to gum up the bearing.
Safety Tips
Clamp the template securely before routing — a shifting template is the number one cause of tear-out and kickback with flush trim bits. Keep both hands on the router and feed against bit rotation, never with it.
Maintenance Tips
Clean pitch and resin off the bearing regularly with a bit cleaner spray; a gummed-up bearing stops spinning freely and will scorch the edge instead of rolling along it. Check the bearing for play every few projects and replace it if it feels loose.
Common Beginner Mistakes
New woodworkers often feed too fast, which causes the bearing to bounce off the template and gouge the work. Another common error is trimming laminate in one aggressive pass instead of sneaking up on the line, which chips the laminate edge.
Workshop Tip
I keep the whole four-piece set in a labeled block right next to the router table so I grab the right length without hunting — matching bit length to material thickness saves you from tear-out at the bottom edge every time.
Pro Tip
For laminate trimming, run the router at a slightly higher RPM and take a light, steady pass rather than slowing down — slowing down on laminate is what causes chip-out at the edge.
Buying Advice
Buy the set rather than a single bit; having the right length on hand for 1/4″ edge banding versus 3/4″ plywood edges pays for itself the first week in a working shop. Look for solid carbide tips and a shielded, sealed bearing.
SEO Image Caption
Flush trim router bit set with top bearing for trimming laminate and edge banding.
SEO ALT Text
Four-piece top bearing flush trim router bit set for laminate and edge banding
Conclusion
A flush trim set earns its keep in any shop doing edge work or pattern routing — it’s one of those bits you don’t think about until you don’t have the right size, and then you really notice.

Double Bearing Flush Trim Router Bit
What is this Router Bit?
This bit carries two bearings — one above the cutting flutes and one below — on a single long shank. That dual-bearing design lets the bit ride a template from either face of the workpiece.
How does it work?
Because there’s a bearing on both ends of the cutting edge, you can flip the workpiece or the template and the bit will still track correctly. On curved or irregular parts, whichever face is against the template, that bearing takes over and guides the cut.
Primary Uses
Pattern-routing curved or irregular shapes where the template might need to sit on top or underneath the stock — guitar bodies, curved furniture parts, and stacked pattern work are the classic use case.
Furniture Applications
Cutting matching curved chair backs, rocker rails, and shaped table aprons from a master pattern, where you need the same profile whether the template is clamped above or below the blank.
Cabinet Applications
Producing identical curved cabinet corbels, scalloped valances, or decorative curved end panels in batches, using one template for every part in the run.
Advantages
Extremely versatile for curved template work since you’re not locked into one bearing orientation; produces consistent results across a whole batch of parts, since every piece follows the exact same master pattern.
Limitations
The longer shank and dual bearings mean less rigidity than a short flush trim bit, so it can chatter in dense hardwoods if you rush the feed rate; not ideal for straight-line flush trimming where a shorter bit is more stable.
Compatible Router Types
Best suited to a router table for controlled, repeatable template work, though it can be used handheld for one-off curved patterns with a steady hand.
Best Wood Types
Mahogany, maple, walnut, and other stable hardwoods commonly used for curved furniture and instrument parts; avoid punky or knotty softwood where the long unsupported flutes can grab.
Safety Tips
Take multiple light passes on curved cuts rather than trying to remove all the waste in one pass — heavy cuts on curves are where kickback happens. Keep push blocks or featherboards in play at the router table.
Maintenance Tips
Inspect both bearings independently since one can wear out before the other; a sluggish lower bearing is easy to miss because it’s hidden under the workpiece during use.
Common Beginner Mistakes
Beginners often forget which bearing is engaged and push the stock the wrong direction, causing a climb cut and a grabby, dangerous kick. Always confirm which face is riding the template before you start the cut.
Workshop Tip
When pattern-routing a curved part, I rough it out on the bandsaw first, staying about 1/16″ proud of the line — that way the router bit is only trimming a whisper of material, not hogging off a full curve in one pass.
Pro Tip
Attach your template with double-sided tape plus a couple of hot glue dots at the corners; screws leave holes you don’t want, and tape alone can shift mid-cut on a long curved pass.
SEO Image Caption
Double bearing flush trim router bit for curved template and pattern routing.
SEO ALT Text
Double bearing flush trim router bit with top and bottom guide bearings
Conclusion
Once you start pattern-routing curved parts, a double bearing flush trim bit becomes indispensable — it’s the bit that makes ten identical curved parts as easy as making one.
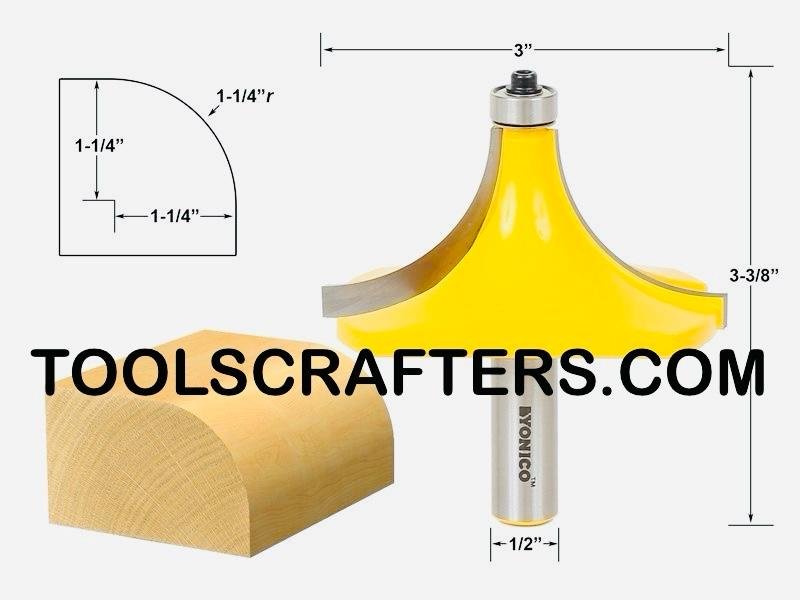
Round Over Router Bit
What is this Router Bit?
A large-radius round over bit with a bottom-mounted bearing, cutting a full 1-1/4″ radius quarter-round profile along an edge.
How does it work?
The bearing rides against the uncut face of the workpiece below the cutting edge, guiding the bit at a consistent depth so the curved cutter rounds the corner into a smooth, continuous quarter-circle.
Primary Uses
Softening sharp edges on tabletops, shelves, stair treads, and any board edge where a bold, comfortable rounded profile is wanted instead of a crisp corner.
Furniture Applications
Rounding thick tabletop edges, workbench tops, chair seat edges, and bed rails where a substantial, tactile roundover is part of the design rather than just a light break.
Cabinet Applications
Softening the front edges of solid wood countertops, island tops, and thick cabinet shelving where a large radius reads as a deliberate design feature.
Advantages
Produces a smooth, glare-free edge with excellent hand-feel; the large 1-1/4″ radius covers thick stock in a single setup without needing to flip the board for a second pass on most projects.
Limitations
Requires thick stock (at least 2-1/2″ to show the full radius) or the profile looks incomplete; the large bearing and cutter combination puts more load on the router, so it’s not a bit to rush through hardwood.
Compatible Router Types
Because of its size, this bit performs best in a router table with a fixed base and steady power; a handheld plunge router can manage it on edges but needs a firm, two-handed grip.
Best Wood Types
Solid maple, oak, and walnut for tabletop edges; also works well in soft pine for workbenches, though softwood needs a slower feed to avoid fuzzing the long grain.
Safety Tips
Rout in two or three passes rather than one full-depth pass — a bit this size removes a lot of material, and taking it all at once strains both the router motor and your control over the cut. Always feed right-to-left on a router table with the fence removed for edge profiles like this.
Maintenance Tips
Because of the amount of material this bit removes, check the carbide edge for dulling more often than you would with a small trim bit; a dull large-radius bit burns wood instead of cutting it.
Common Beginner Mistakes
Trying to cut the full radius in a single pass is the most common mistake — it bogs the router down and leaves burn marks on the high points of the curve. Beginners also often skip climb-cutting the last few inches on figured grain, leading to tear-out at the very end of the pass.
Workshop Tip
On a router table, I set the bit about 1/3 of final depth for the first pass, raise it for a second pass, and finish at full depth on the third — three light passes beat one heavy pass every time on a bit this large.
Pro Tip
Run a scrap piece of the same species and thickness through your exact setup first; a 1-1/4″ radius bit shows tear-out immediately if your feed rate or bit speed is off, and it’s far cheaper to find that out on scrap.
Buying Advice
Buy 1/2″ shank rather than 1/4″ for a bit this size — the extra shank diameter resists deflection and chatter noticeably on a cut this large. A ball-bearing guide with a sealed race is worth the extra cost since this bit gets heavy use.
SEO Image Caption
Large radius round over router bit for softening thick furniture and countertop edges.
SEO ALT Text
1-1/4 inch round over router bit with bearing guide for edge profiling
Conclusion
For thick tabletops and countertops where you want a bold, comfortable edge rather than a subtle break, this large round over bit is the one I reach for — it turns a sharp slab edge into something people actually want to run their hand along.
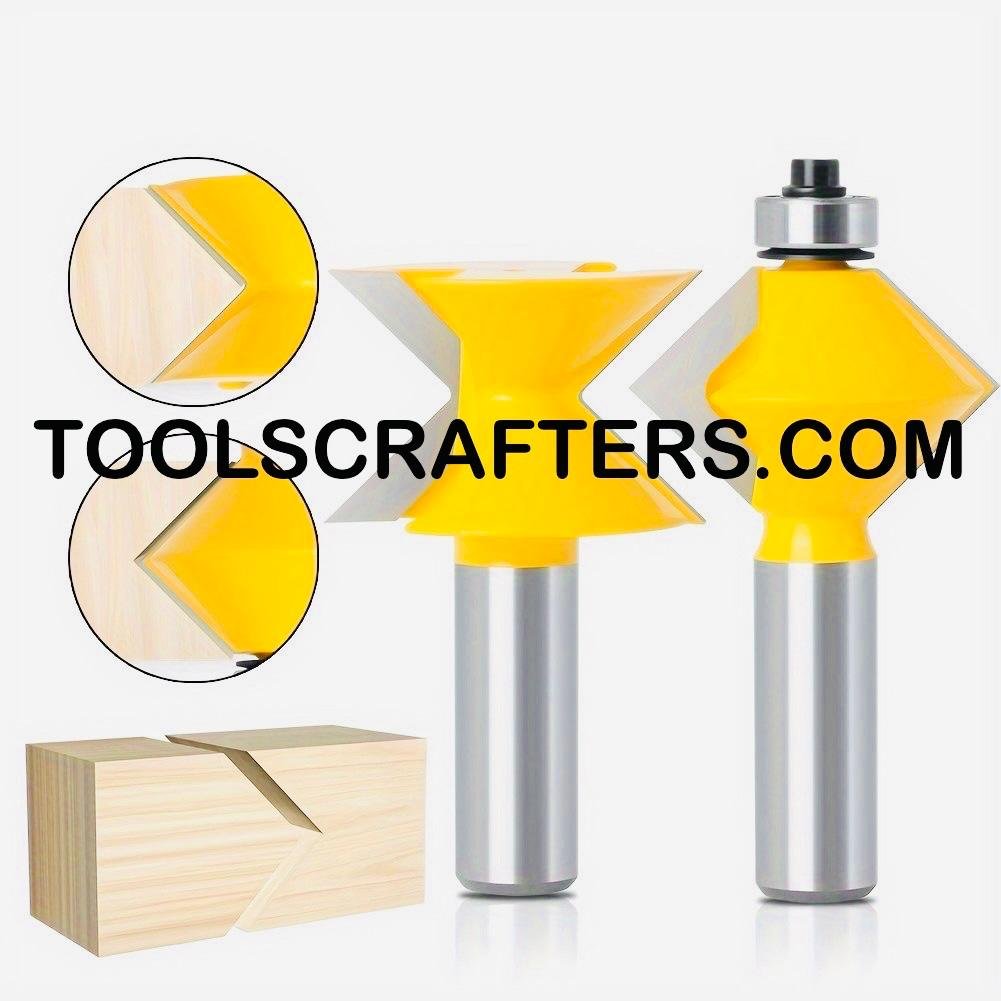
45° Chamfer Router Bit
What is this Router Bit?
A double-ended chamfer bit that cuts a precise 45-degree bevel into the edge of a workpiece, shown here creating matching angled edges that meet cleanly at a point when two pieces are brought together.
How does it work?
The angled carbide cutters slice a flat bevel across the corner of the board at exactly 45 degrees. When two boards are each chamfered this way and butted together, their bevels form a crisp V-line or a mitered-looking seam without an actual miter saw cut.
Primary Uses
Beveling edges on boxes, panels, and trim; creating decorative V-groove reveals between boards; softening sharp corners on a workpiece with a flat angled facet instead of a curve.
Furniture Applications
Chamfering the edges of tabletop panels and shelf edges for a modern, faceted look, and cutting matching bevels on breadboard ends or panel joints where a crisp angled line is part of the design.
Cabinet Applications
Beveling cabinet door edges for a shadow-line detail, chamfering the corners of face frame stock, and cutting matching angled edges on panel-and-frame doors where the bevel meets at the joint line.
Advantages
Gives a crisp, consistent 45-degree line every time, which is far more repeatable by router than trying to hand-plane a chamfer; works equally well on straight and curved edges since the bit isn’t following a fence, it’s following the bearing or edge.
Limitations
A 45-degree chamfer removes a fixed amount of material regardless of board thickness, so on thin stock the bevel can look oversized; not adjustable to other angles without swapping bits.
Compatible Router Types
Works well handheld with an edge guide for straight runs, and excels in a router table when chamfering multiple identical parts for a production door or panel run.
Best Wood Types
Oak, ash, and maple hold a crisp chamfer line beautifully; walnut also chamfers cleanly, though its softer early-wood grain needs a slightly slower feed to avoid fuzzing along the bevel.
Safety Tips
Feed steadily and avoid pausing mid-cut — a chamfer bit sitting still in one spot will burn a visible dark line into the bevel that’s very hard to sand out cleanly. Keep fingers well clear of the cutting edge, which sits close to the fence on table setups.
Maintenance Tips
Wipe resin buildup off the angled carbide faces after every few passes in resinous wood; buildup on the cutting edge is what causes the burning beginners often blame on the router speed.
Common Beginner Mistakes
The most common mistake is not test-fitting the chamfer angle on scrap before cutting the final parts — if the two mating pieces don’t meet perfectly, the seam gap is very visible. Beginners also often rout too deep in one pass, leaving burn marks along the bevel.
Workshop Tip
When I need two boards to meet in a clean V at a seam, I chamfer both in the same setup without moving the fence — that guarantees the angles match exactly, since any change in fence position changes the bevel width.
Pro Tip
For a crisper shadow line on cabinet doors, take the chamfer in two light passes rather than one deep pass — the second light pass cleans up any fuzz left by the first and leaves a bevel that needs zero sanding.
Buying Advice
Look for a chamfer bit with a large enough cutting diameter to bevel your thickest stock in one setting, and confirm the bearing (if bearing-guided) is sealed — chamfer bits see a lot of use on box and cabinet production runs.
SEO Image Caption
45 degree chamfer router bit cutting matching angled bevel edges.
SEO ALT Text
45 degree chamfer router bit for beveled edges and V-groove joints
Conclusion
A 45° chamfer bit is one of the simplest bits in the drawer, but it’s the one that gives your work that clean, deliberate, “someone who knew what they were doing built this” look along every edge and seam.
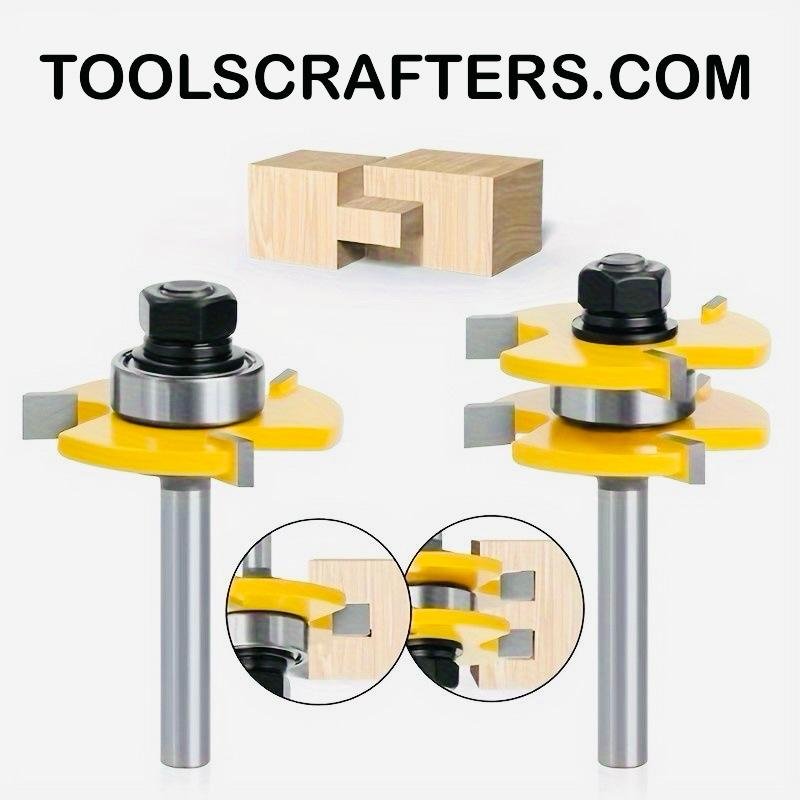
Tongue & Groove Router Bit Set
What is this Router Bit?
A matched two-piece bit set — one bit cuts a centered tongue on the edge of a board, the other cuts a matching groove on the mating board, shown here forming an interlocking edge-to-edge joint.
How does it work?
Each bit in the set has stacked cutters that remove material from both faces of the board edge, leaving a centered tongue on one board and a slot on the other. When the two edges are pushed together, the tongue seats into the groove and the boards align flush and tight.
Primary Uses
Joining boards edge-to-edge for wide panels, paneling, wainscoting, and flooring, where a self-aligning, glue-friendly joint is needed along a long edge.
Furniture Applications
Gluing up solid wood tabletops and panel-door insert boards edge-to-edge, where the tongue and groove keeps every board perfectly flush during clamping instead of sliding under clamp pressure.
Cabinet Applications
Building tongue and groove cabinet backs and beadboard-style panel inserts, and joining wide cabinet end panels from narrower stock without visible fasteners.
Advantages
Self-aligns during glue-up, dramatically increasing glue surface area compared to a plain butt joint, and hides the joint line almost completely once assembled and sanded.
Limitations
Both bits must be set to matching heights and depths precisely, or the tongue will be loose or won’t seat fully; requires a router table for consistent, repeatable results across many boards.
Compatible Router Types
This is a router-table bit set — the fence and consistent bit height needed for accurate tongue and groove work make handheld use impractical for anything beyond a single test cut.
Best Wood Types
Pine and cedar for paneling and beadboard, oak and maple for structural panel glue-ups; avoid very soft or punky wood where the thin tongue can snap during assembly.
Safety Tips
Always run a test joint in scrap of the exact same thickness before committing your project boards — a mismatched tongue and groove wastes good material. Use featherboards to keep consistent pressure against the fence on every pass.
Maintenance Tips
Store the two bits together in a labeled case so you never mix up the tongue cutter and groove cutter between projects; keep the stacked cutters free of resin buildup, which is where dimensional accuracy is lost first.
Common Beginner Mistakes
The most common error is cutting the groove and tongue on different router table setups without re-checking bit height, which throws the joint out of alignment. Beginners also often forget to account for wood movement, cutting the joint too tight for seasonal expansion.
Workshop Tip
I always mill a set of test scraps from the actual project stock and dry-fit the tongue and groove before running a single real board — any adjustment to bit height is far easier to make before you’ve committed material.
Pro Tip
Leave a hair of extra clearance in the groove depth rather than a bottomed-out fit — a tongue that bottoms out in the groove can crack the groove wall under clamping pressure, while a slightly shy fit still glues rock solid.
Buying Advice
Buy the matched set from a single manufacturer rather than mixing brands — even small differences in cutter geometry between brands can leave you with a loose or overly tight fit.
SEO Image Caption
Tongue and groove router bit set for edge-to-edge panel and board joinery.
SEO ALT Text
Tongue and groove router bit set for panel glue-ups and paneling
Conclusion
Any time I’m gluing up a wide panel or building paneled backs, this tongue and groove set is what keeps every board flush and aligned — it turns a fussy clamp-up into a joint that practically assembles itself.
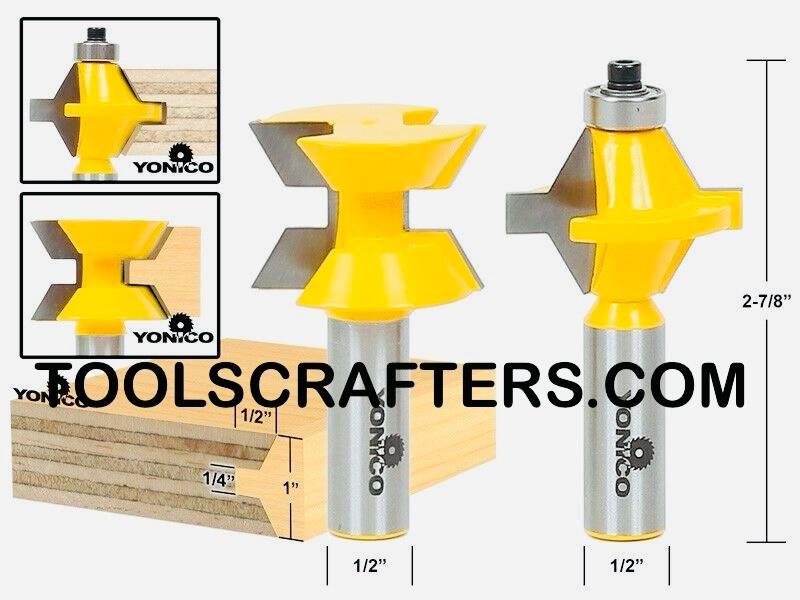
Lock Miter Router Bit (45° Lock Miter)
What is this Router Bit?
A single bit with an hourglass-shaped cutting profile that cuts a 45-degree interlocking miter joint. The same bit cuts both mating parts of the joint — one board is run flat against the table, the other stood on end — shown here as a two-bit reference pair with dimension callouts.
How does it work?
The stepped, angled profile of the bit cuts a series of interlocking angled faces. When one board is fed flat and its mating board is fed on edge using the same bit and fence setting, the two profiles nest together to form a strong 45-degree mitered corner with a mechanical interlock, not just a glued miter face.
Primary Uses
Building strong mitered box corners, drawer boxes, and column or post wraps where you want the clean look of a miter joint but with far more glue surface and mechanical strength than a plain miter.
Furniture Applications
Wrapping solid or veneered panels around table legs and posts, building mitered box corners on jewelry boxes and small case pieces, and constructing picture-frame-style corners on furniture trim.
Cabinet Applications
Building drawer boxes with a strong, self-aligning mitered corner, and wrapping cabinet end panels or fillers where the grain needs to appear continuous around a corner.
Advantages
Produces a joint that’s both visually seamless (no exposed end grain like a butt joint) and mechanically strong, since the interlocking profile resists racking far better than a plain 45-degree miter.
Limitations
This is one of the trickier router table setups in the shop — bit height and fence position must be dialed in precisely, and even a small error means the two halves won’t meet flush at the corner.
Compatible Router Types
Strictly a router table bit, ideally on a router with enough horsepower to handle the deep, aggressive profile without bogging down; not suited to handheld use.
Best Wood Types
Cherry, maple, and walnut for fine box work; Baltic birch plywood for drawer boxes, since its stable, void-free core holds the delicate interlocking profile without chipping.
Safety Tips
This bit removes a large, aggressive profile — always feed slowly and use a tall auxiliary fence or a shop-made jig to support the on-edge workpiece safely and keep fingers well away from the cutter.
Maintenance Tips
Because the profile is complex, keep the carbide edges clean and check them under good light for chipping after every project — a nicked edge on this bit shows up immediately as a gap in the joint.
Common Beginner Mistakes
The single biggest beginner mistake is skipping test cuts — lock miter joints depend entirely on exact bit height, and almost nobody gets it right on the first try. Also common: running the two mating boards through at different fence settings, which throws the whole joint out of alignment.
Workshop Tip
I mill four or five test pieces at the project’s actual thickness before touching real material, and I mark my final bit height with a setup block once I find it — that block gets reused every time I pull this bit out again.
Pro Tip
Sneak up on the bit height in tiny increments and test-fit after every adjustment; once you find the sweet spot, lock the router lift and don’t touch it again until the entire batch of parts is cut.
Buying Advice
Choose a lock miter bit sized appropriately for your typical stock thickness — these bits are usually rated for a specific thickness range, and running material outside that range will never yield a flush joint no matter how you adjust the setup.
SEO Image Caption
Lock miter router bit for interlocking 45 degree mitered box and panel joints.
SEO ALT Text
45 degree lock miter router bit for strong interlocking mitered corners
Conclusion
The lock miter bit takes patience to set up, but once you’ve dialed it in, it produces one of the strongest, cleanest-looking corner joints you can cut on a router table — worth every minute spent on test cuts.
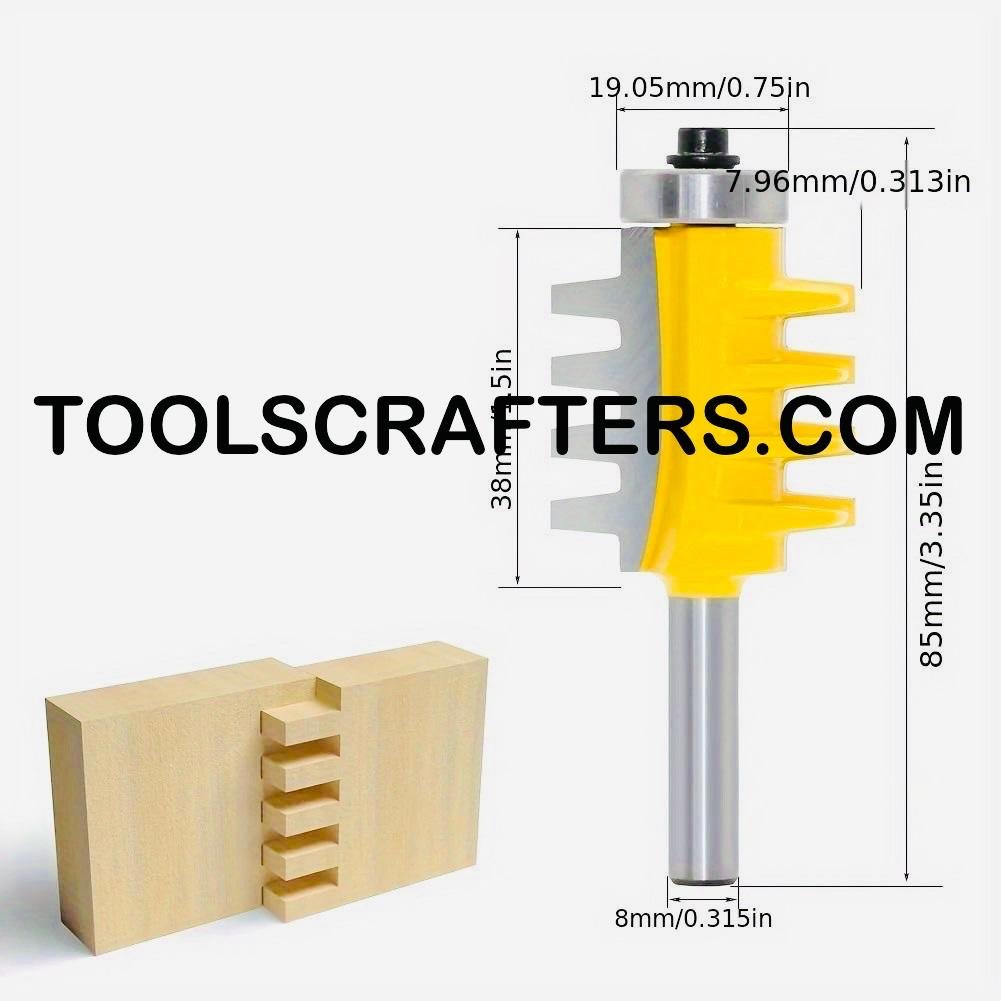
Finger Joint Router Bit
What is this Router Bit?
A comb-profile bit with a series of matched square teeth along its cutting edge, shown here cutting interlocking box/finger joints into the end of a board.
How does it work?
The comb-shaped carbide teeth cut a row of evenly spaced fingers and matching notches into the end grain of a board. When two boards cut with the same bit are rotated and mated, the fingers from each board interleave, creating a joint with a large glued surface area.
Primary Uses
Cutting box joints (also called finger joints) for drawer and small box corners, and edge-gluing shorter stock into longer lengths for structural or utility purposes.
Furniture Applications
Building visible, decorative box-joint corners on small chests, jewelry boxes, and drawer fronts where the interlocking finger pattern is left exposed as a design feature.
Cabinet Applications
Constructing strong, self-squaring drawer boxes and small cabinet drawers where the large glue surface of a finger joint outperforms a simple butt or rabbet joint for long-term durability.
Advantages
Creates an exceptionally strong joint due to the sheer amount of long-grain-to-long-grain glue surface; self-squares the corner during glue-up since the fingers only fit together one way, cleanly.
Limitations
Requires a precise jig or router table sled to hold the workpiece square and indexed correctly — freehand cutting finger joints is not realistic; any error in indexing shows up immediately as a misaligned finger.
Compatible Router Types
This bit is used almost exclusively in a router table with a dedicated box joint jig or indexing sled; a handheld router cannot hold the precision this joint requires.
Best Wood Types
Maple, birch plywood, and poplar for drawer boxes; walnut and cherry for decorative exposed finger joints where the contrasting end grain pattern is part of the visual appeal.
Safety Tips
Keep hands well clear of the comb-toothed cutter at all times — this bit has multiple exposed cutting edges across its width, more than a standard straight bit. Use a jig with a solid backer board to prevent tear-out and to keep fingers away from the cutter.
Maintenance Tips
Inspect each individual tooth for chipping since a single damaged tooth will leave a visibly different finger width on every joint you cut afterward; keep the whole comb profile free of pitch buildup for consistent widths.
Common Beginner Mistakes
The most common mistake is not making a proper indexing jig, leading to fingers that don’t line up between mating boards. Beginners also often use scrap that’s slightly out of square, which throws off every finger in the joint.
Workshop Tip
I dedicate one sled specifically to this bit and never repurpose it for anything else — a jig that’s been nudged out of true even slightly will throw off finger spacing on every single joint cut afterward.
Pro Tip
Cut a sacrificial backer board behind your workpiece on every pass — it eliminates blowout on the back face of the last finger, which is the one spot beginners almost always miss until it’s too late.
Buying Advice
Match the bit’s finger width to the scale of your project — a wide finger spacing looks appropriate on a blanket chest but oversized on a small jewelry box, so buy a size (or a couple of sizes) that fits the work you actually do.
SEO Image Caption
Finger joint router bit cutting interlocking box joint corners.
SEO ALT Text
Finger joint router bit for box joint drawer and corner joinery
Conclusion
A finger joint bit paired with a good indexing jig turns end-grain corners into one of the strongest, most satisfying joints you can cut — and once you’ve dialed in the jig, repeating it across a whole set of drawers is fast and consistent.
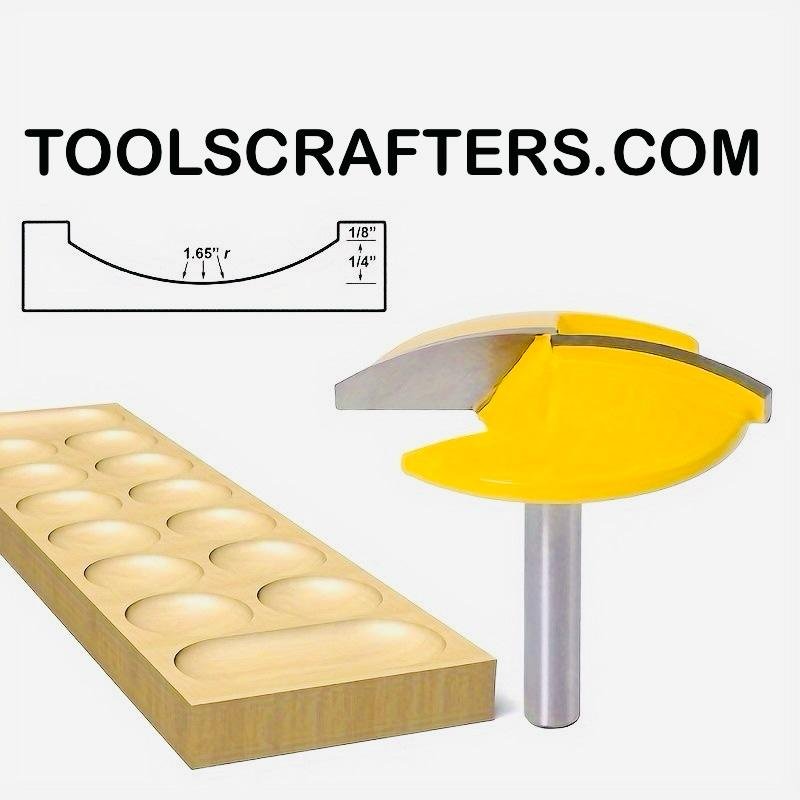
Bowl & Tray Router Bit
What is this Router Bit?
A large-diameter, deeply radiused bit designed to hollow out smooth, round-bottomed cavities, shown here carving a row of shallow bowl-like depressions into a serving tray blank.
How does it work?
The wide curved cutting edge sweeps material out of the workpiece in overlapping circular or elongated passes, following a template, a circle jig, or a plunge-and-sweep freehand technique to leave a smooth concave cavity with rounded walls and floor.
Primary Uses
Hollowing serving trays, cutting boards with rounded catch-basins, jewelry dishes, and shallow decorative bowls without needing a lathe.
Furniture Applications
Carving recessed catch trays into console tables or valet stands, and hollowing decorative inset dishes into occasional tables where a lathe isn’t practical for the shape.
Cabinet Applications
Less common in cabinetry directly, but used for shop-made drawer organizer inserts and recessed cavity trays fitted inside cabinet drawers for jewelry or utensil storage.
Advantages
Lets you hollow smooth, rounded cavities without a lathe or CNC, and the large sweep of the bit leaves a noticeably smoother interior surface than trying to achieve the same shape with a small core box bit.
Limitations
Best used with a router jig, circle jig, or plunge base for controlled, even results — freehand sweeping without a guide can leave an uneven, wavy floor that’s obvious once finished.
Compatible Router Types
A plunge router is strongly preferred for this bit, ideally mounted in a router sled or template jig that controls the sweep pattern and prevents digging in at the edges of the cavity.
Best Wood Types
Basswood and cherry are forgiving and carve smoothly; hard maple gives a beautiful, durable serving surface but demands a slower, more patient sweep due to its density.
Safety Tips
Always start cuts in the center of the planned cavity and work outward in controlled passes — plunging straight into full depth at the edge of a cavity is a common way to grab and kick the router. Wear a dust mask, since bowl routing generates a large volume of fine dust.
Maintenance Tips
Because this bit removes large volumes of material, it dulls faster than smaller profile bits — resharpen or replace it as soon as you notice increased burning or resistance during a cut.
Common Beginner Mistakes
Trying to hollow the full depth in one pass is the most common mistake, which overloads the router and leaves a rough, burned floor. Beginners also often sweep too fast at the edges of the cavity, leaving visible ridges where passes don’t overlap evenly.
Workshop Tip
I rough out the cavity in 1/8″ incremental depth passes using a simple plywood template as a fence, then do one final light “cleanup pass” at full depth with a slow, steady sweep — that last pass is what gives the smooth, finished look.
Pro Tip
Sand while the piece is still secured in the same jig or clamps used for routing — trays and bowls are much easier to sand evenly before you’ve released the clamping pressure that’s been holding the blank flat.
Buying Advice
Look for a bit with a large enough sweep radius to match the size of tray or bowl you typically make — a bit that’s too small means far more overlapping passes and more time at the router table.
SEO Image Caption
Bowl and tray router bit hollowing rounded serving tray cavities.
SEO ALT Text
Bowl and tray router bit for hollowing wooden serving trays and dishes
Conclusion
For anyone making serving trays, catch-all dishes, or shallow bowls without a lathe, this bit is the shortcut — a bit of patience with layered passes gets you a smooth, professional hollow every time.
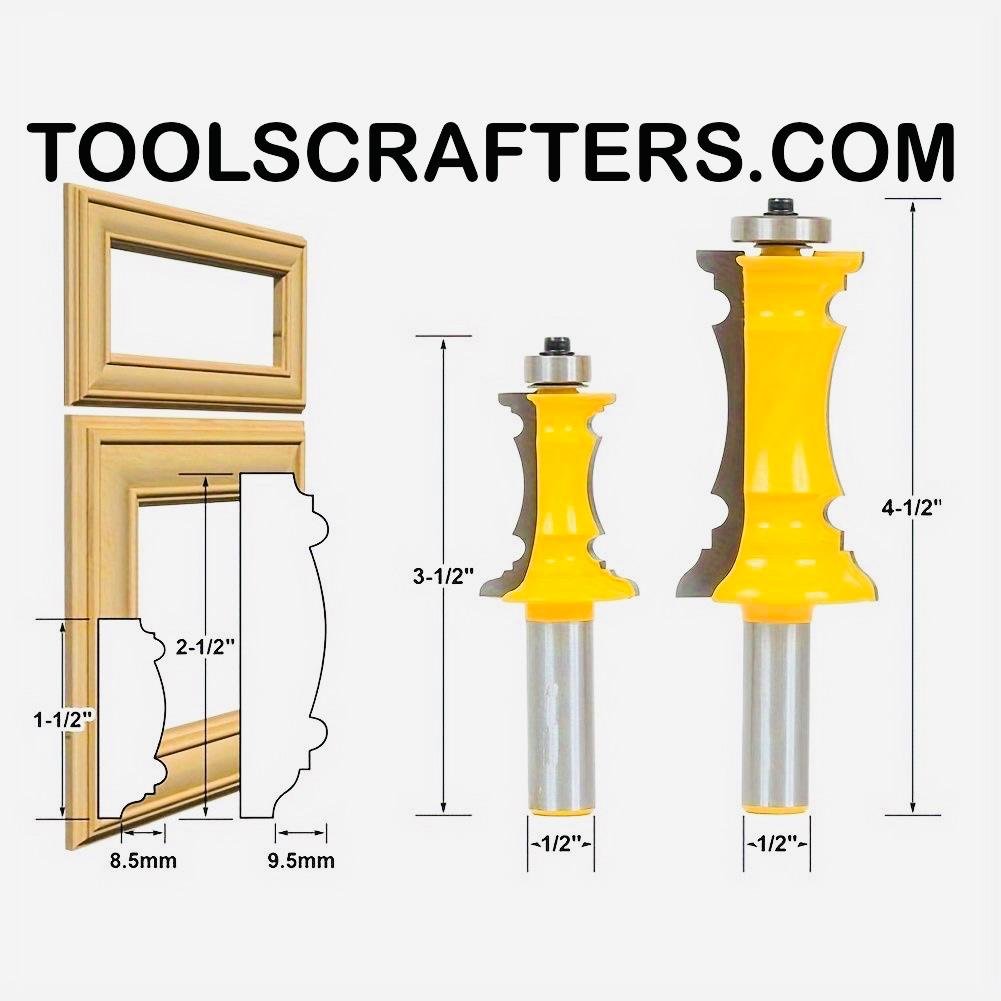
Door & Window Casing Router Bit
What is this Router Bit?
A large decorative profile bit set with a deep, multi-curve S-shaped cutting edge, shown in two sizes, producing the classic stepped, sculpted molding profile used on door and window casing and picture-frame-style trim.
How does it work?
The bearing-guided bit rides along the edge of the board, and its complex multi-curve profile removes material in a single pass to leave a decorative, dimensional molding edge with several convex and concave transitions, matching traditional millwork profiles.
Primary Uses
Milling custom door and window casing, picture frame stock, and decorative trim molding that matches or replaces traditional profiled millwork.
Furniture Applications
Creating decorative frame moldings for mirrors, cabinet doors with applied frame details, and headboard or footboard trim where a substantial, traditional profile is called for.
Cabinet Applications
Producing custom casing to match existing house trim when building in cabinetry, and milling decorative frame stock for raised panel cabinet doors that need a traditional, formal profile.
Advantages
Replicates expensive traditional millwork profiles at a fraction of the cost of buying pre-milled trim, and lets you match an existing historic profile exactly if you have a sample piece to reference.
Limitations
This is an aggressive, deep-profile bit that requires a router table and considerable power; it’s not a bit for a light-duty trim router, and the deep cut demands multiple passes in hardwood.
Compatible Router Types
Router table only, with a router that has enough horsepower (typically 2 HP or greater) to drive the wide cutting diameter through hardwood without bogging or burning.
Best Wood Types
Poplar and pine for paint-grade casing, oak and cherry for stain-grade trim and furniture-quality frame stock.
Safety Tips
Take this profile in multiple shallow passes, raising the bit gradually to final height — attempting full depth in one pass on a bit this large is a serious kickback risk. Use featherboards and push blocks throughout.
Maintenance Tips
Because of the intricate profile, check every curve of the cutting edge for nicks after each use — a damaged spot on one curve of the profile will show up as a visible flaw along the entire length of trim you cut.
Common Beginner Mistakes
Rushing the feed rate on a profile this complex causes chatter marks in the tighter curves of the molding. Beginners also commonly skip a final light “skim pass,” which is what removes the mill marks left by the earlier heavier passes.
Workshop Tip
I always mill a foot or two of test profile in the same species before committing full-length casing stock — this bit’s profile is complex enough that even small grain-direction issues become obvious immediately on a test piece.
Pro Tip
Miter your casing corners only after the profile is fully milled and sanded — trying to profile-match a mitered corner after the fact rarely lines up as cleanly as milling the full length first, then cutting miters last.
Buying Advice
Check that the profile depth matches your stock thickness before buying — a casing profile bit sized for 3/4″ stock will look thin and incomplete on 5/8″ material, so match bit to your actual trim thickness.
SEO Image Caption
Door and window casing router bit for decorative trim and picture-frame molding.
SEO ALT Text
Door and window casing router bit for decorative frame and trim molding
Conclusion
When a project calls for real, dimensional trim instead of flat modern stock, this casing bit is what gets you there — it’s a slower cut, but the finished molding looks like it came from a proper millwork shop.
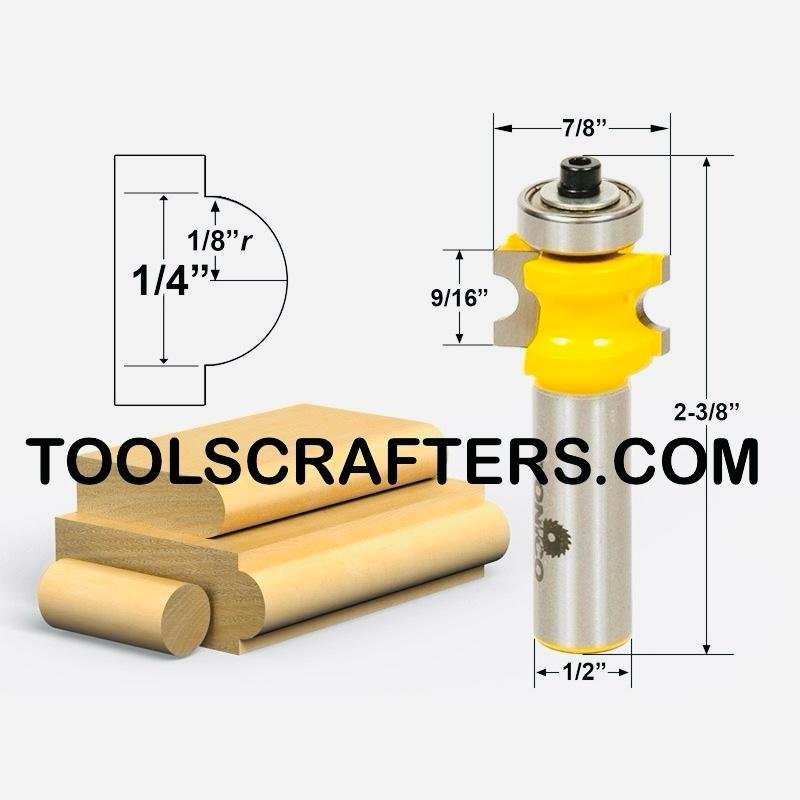
Roman Ogee Router Bit
What is this Router Bit?
A bearing-guided bit with a classic S-curve cutting profile — a convex roundover that flows into a concave cove — shown here creating the traditional ogee edge on a wood block sample.
How does it work?
The bearing tracks along the uncut face of the board below the profile, and the S-shaped carbide edge cuts the convex-then-concave curve in one pass, leaving the traditional stepped ogee line along the edge.
Primary Uses
Decorative edge treatments on tabletops, shelves, picture frames, and any project where a traditional, formal edge profile is wanted instead of a plain roundover or chamfer.
Furniture Applications
Profiling tabletop edges, dresser top edges, and mirror or picture frame edges where a classic, dimensional line adds visual interest without a bulky, oversized molding.
Cabinet Applications
Edge-profiling cabinet crown returns, shelf edges in display cabinetry, and decorative edges on cabinet top caps where a traditional look is called for.
Advantages
Adds significant visual detail and a shadow line to an edge in a single pass, and the bearing guide makes it easy to follow curved or irregular edges as well as straight ones.
Limitations
The tight inner curve of the ogee profile is prone to burning in dense hardwood if the feed rate is too slow, and the fine step at the top of the profile can chip out on figured or interlocked grain.
Compatible Router Types
Works well both handheld with the bearing riding the board edge, and in a router table for longer, straighter runs where consistent pressure against the bit is easier to maintain.
Best Wood Types
Cherry and maple show off the ogee’s shadow lines beautifully; oak also profiles cleanly, though open-grained species need a slightly slower feed to avoid fuzzing in the concave section.
Safety Tips
Keep steady, even feed pressure through the whole profile — pausing partway through an ogee cut leaves a visible burn ring exactly where the router stopped. Support long boards with outfeed stands to keep the cut consistent end to end.
Maintenance Tips
The fine detail edges of an ogee profile dull faster than a simple roundover; check the tip of the profile (the thinnest part of the carbide) regularly since that’s where wear shows up first.
Common Beginner Mistakes
New woodworkers often rout the full profile in one heavy pass, which leaves burn marks in the tight cove section. Skipping a climb cut on the last inch of figured grain is another common cause of chip-out right at the end of the board.
Workshop Tip
On figured or interlocked grain, I take a very light climb cut of about 1/16″ on the last few inches of the profile before running the full pass in the normal direction — it prevents the tear-out that shows up right at the trailing edge of a board.
Pro Tip
Slightly ease the sharp step at the top of the ogee with 220-grit sandpaper after routing — it softens the transition just enough to avoid chipping in use without visibly changing the profile’s crisp look.
Buying Advice
Buy a Roman ogee bit with a bearing sized to leave the profile shoulder you actually want — different bearing diameters change how much flat area remains above the curve, so check the spec sheet against your design.
SEO Image Caption
Roman ogee router bit creating a classic S-curve decorative edge profile.
SEO ALT Text
Roman ogee router bit for decorative S-curve edge profiling
Conclusion
The Roman ogee is one of those profiles that instantly reads as “quality furniture” — it’s a single-pass bit that adds real craftsmanship to an edge without a lot of extra setup time.

Rule Joint Router Bit (Drop Leaf Table Bit)
What is this Router Bit?
A matched bead-and-cove profile bit that cuts the classic rule joint — a rounded bead on one board edge and a matching cove on the mating board — shown here forming the hinged joint used on drop-leaf and gateleg tables.
How does it work?
The bit cuts a convex bead on the fixed tabletop edge and a corresponding concave cove on the drop-leaf edge. When a special drop-leaf hinge is installed beneath the joint, the bead and cove rotate against each other smoothly as the leaf is raised and lowered, hiding the hinge from view when the leaf is up.
Primary Uses
Cutting the hinge-line joint on drop-leaf and gateleg tables where the leaf needs to fold down cleanly while the joint face stays visually seamless when the leaf is up.
Furniture Applications
Building traditional drop-leaf dining and side tables, gateleg tables, and any hinged tabletop leaf where a rule joint is more elegant than a plain butt-hinged edge.
Cabinet Applications
Rarely used in standard cabinetry, but occasionally applied to fold-down cabinet worksurfaces or drop-down desk leaves where the same hidden-hinge visual effect is desired.
Advantages
Produces a joint that looks completely seamless when the leaf is closed, hides the hinge hardware from view, and allows smooth rotation of the leaf without the joint line opening into a visible gap.
Limitations
Requires precise alignment between the bead and cove halves and correct placement of the drop-leaf hinges beneath the joint — a misaligned rule joint hinge causes the leaf to bind or the profile to gap when lowered.
Compatible Router Types
Best run on a router table for consistent, repeatable bead and cove depth across the full length of the tabletop edge.
Best Wood Types
Cherry, mahogany, and maple are traditional choices for drop-leaf tables and profile cleanly; walnut also works well, provided the feed rate is kept steady through the cove to avoid tear-out.
Safety Tips
Test the bead and cove fit on scrap the same thickness as your tabletop before cutting the real boards — this joint depends on a precise mating fit, and mistakes are costly on finished tabletop stock. Keep hands clear of the bit and use push blocks on narrower leaf stock.
Maintenance Tips
Check that the bead and cove profiles remain crisp and free of nicks, since even a small flaw in either half of the joint becomes very visible on a formal tabletop surface.
Common Beginner Mistakes
Forgetting to account for the hinge mortise location before cutting the profile is a common and frustrating mistake — plan the hinge placement first, since it must sit precisely beneath the rule joint’s pivot point. Beginners also sometimes cut the bead and cove halves on different setups, leading to a mismatched radius.
Workshop Tip
I cut both halves of the rule joint back-to-back on the same router table setup without changing the bit height between them — that’s the only way to guarantee the bead and cove radii actually match.
Pro Tip
Dry-fit the joint with the actual drop-leaf hinges installed before final glue-up or finishing — the hinge geometry has to work with the joint’s pivot point, and it’s much easier to adjust before the finish is on.
Buying Advice
Buy a rule joint bit sized to your tabletop thickness, and confirm it’s compatible with standard drop-leaf table hinges — some profiles are cut specifically to match common hinge geometries, which saves a lot of trial and error.
SEO Image Caption
Rule joint router bit for drop leaf table bead and cove hinge joinery.
SEO ALT Text
Rule joint router bit for drop leaf table bead and cove joint
Conclusion
The rule joint bit is a specialty tool, but for anyone building a proper drop-leaf table, it’s the bit that gives the leaf that classic, seamless swing — no visible hinge line, just a smooth traditional joint.
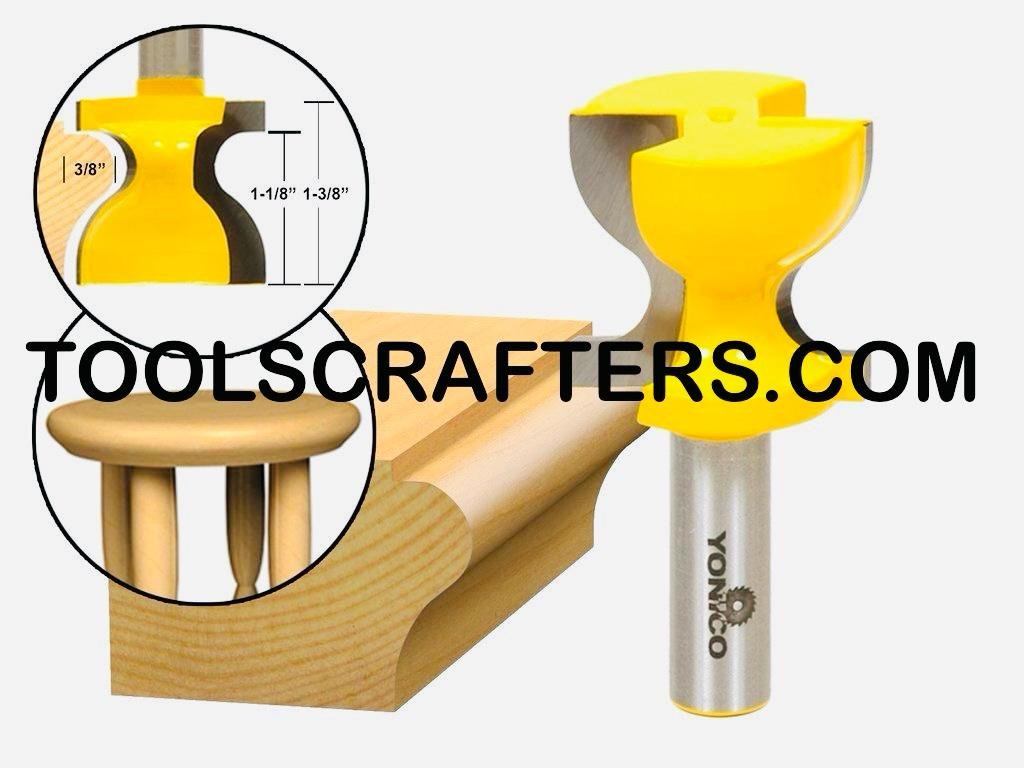
Frame Molding Router Bit
What is this Router Bit?
A large single decorative profile bit with a deep, sculpted S-curve edge, shown producing a substantial picture-frame-style molding profile on a mitered wood frame sample.
How does it work?
The bearing-guided bit runs along the board edge in one pass, and its deep multi-curve profile carves a dimensional, sculpted molding face suited to mitered frame corners and applied trim.
Primary Uses
Milling picture frame stock, mirror frame molding, and applied decorative frame trim for cabinet doors and panel inserts.
Furniture Applications
Producing mirror and picture frame stock, decorative applied moldings around cabinet door panels, and trim around inset furniture panels where a dimensional frame line is wanted.
Cabinet Applications
Milling frame molding to apply around flat cabinet door panels for a raised-panel look, and producing matching trim for glass-front cabinet doors.
Advantages
Delivers a deep, dimensional profile in a single pass that would otherwise require several simpler bits run in sequence, and produces consistent, repeatable molding for long production runs of matching frame stock.
Limitations
Being a deep, wide profile, it requires a router table with adequate horsepower and multiple passes in hardwood to avoid burning or bogging the motor down.
Compatible Router Types
Router table use only — the cutting diameter and profile depth are too aggressive for safe or accurate handheld routing.
Best Wood Types
Poplar for paint-grade frames, oak and maple for stain-grade picture and mirror frames where the profile’s shadow lines need to read clearly under a clear finish.
Safety Tips
Rout in progressive passes, increasing bit height gradually to full depth — this bit removes a large volume of material and a single full-depth pass risks kickback and motor strain. Always use featherboards to maintain consistent pressure against the fence.
Maintenance Tips
Inspect the full profile edge carefully after each project; a nick anywhere along this complex curve will telegraph onto every length of molding cut afterward.
Common Beginner Mistakes
Cutting the miters before the profile is fully sanded and inspected is a common mistake — any flaw in the milled profile is much easier to fix on a straight length than after it’s already mitered into a frame. Beginners also often rush the feed rate through the deepest part of the curve, causing visible chatter.
Workshop Tip
I always mill several extra inches of length beyond what’s needed for the frame — that gives me clean material for test-fitting miter angles without risking the actual frame stock.
Pro Tip
Sand the profile lightly by hand with a shaped sanding block that matches the curve before mitering — machine sanding tends to round over the crisp lines of a deep profile like this one.
Buying Advice
Choose a frame molding bit with a profile depth that matches the visual weight you want — a deep profile suits a substantial mirror frame, while a shallower version suits smaller picture frames where a heavy profile would look out of scale.
SEO Image Caption
Frame molding router bit for picture frame and cabinet door trim profiles.
SEO ALT Text
Frame molding router bit for decorative picture frame and panel trim
Conclusion
For frame and mirror work, this bit turns plain stock into finished-looking molding in one pass — it’s a bigger, more deliberate profile than a simple edge treatment, and it shows.
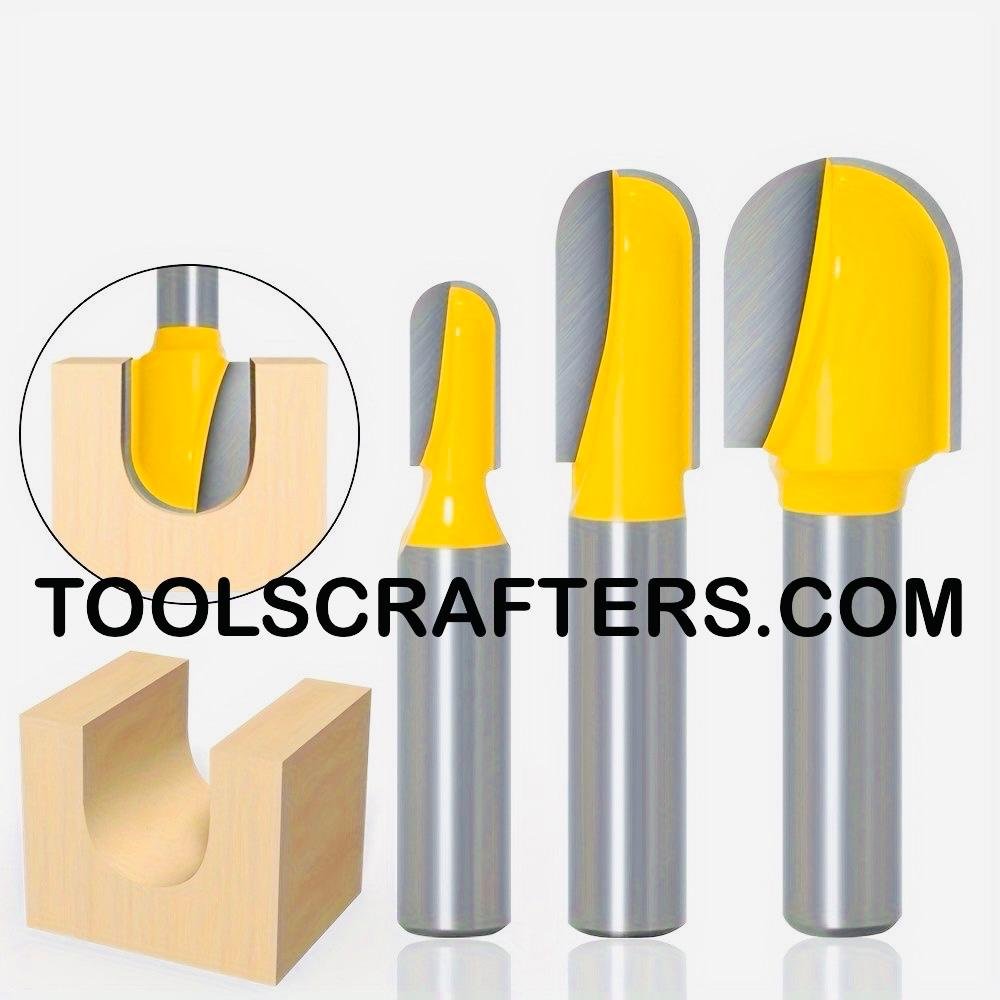
Round Nose (Core Box) Router Bit
What is this Router Bit?
A set of three round nose bits in increasing diameters, each cutting a smooth, U-shaped concave groove, shown here hollowing a rounded channel into a wood block.
How does it work?
The rounded carbide tip plunges into the wood and sweeps along a straight or curved path, removing material to leave a consistent, semi-circular channel with smooth, rounded walls and a rounded floor rather than a flat-bottomed groove.
Primary Uses
Cutting decorative flutes, sign-carving lettering and backgrounds, and shaping rounded slots and grooves such as finger pulls or decorative channels.
Furniture Applications
Fluting table legs and columns, carving finger-pull grooves into drawer fronts as an alternative to hardware pulls, and cutting decorative inlay channels.
Cabinet Applications
Routing integrated finger-pull grooves on handleless cabinet doors and drawers, and cutting decorative fluted detail on face frame stiles or cabinet columns.
Advantages
The three-size set covers everything from fine decorative detail to bold, substantial grooves in one purchase, and the rounded profile leaves a smooth, comfortable channel that’s pleasant to the touch on finger-pull applications.
Limitations
Freehand routing with this bit takes practice to keep a consistent groove depth; without a straightedge or template, it’s easy to wander off a straight line.
Compatible Router Types
Works well handheld with an edge guide or straightedge clamped to the work for straight flutes, and performs well in a router table for repeatable, consistent grooves across multiple parts.
Best Wood Types
Basswood and poplar for detailed sign carving, since they cut cleanly with minimal tear-out; oak and maple for structural flutes and finger pulls where durability matters more than fine carving detail.
Safety Tips
Plunge slowly into the workpiece rather than dropping the bit in at full speed — a sudden plunge with a round nose bit can grab and jump. Keep a firm two-handed grip when freehanding curved or lettered paths.
Maintenance Tips
Because the rounded tip does a lot of plunging work, check it for chipping at the very center point regularly — that’s the highest-wear area on this style of bit and the first place dulling becomes noticeable.
Common Beginner Mistakes
Freehanding a groove without a straightedge or template is the most common beginner mistake, resulting in wandering, uneven channels. Beginners also often try to cut full groove depth in one plunge, which increases the risk of the bit grabbing and jumping off line.
Workshop Tip
For finger-pull grooves, I always clamp a straightedge fence to the workpiece and make two shallow passes rather than one deep plunge — it keeps the groove perfectly straight and leaves a smoother, more comfortable radius.
Pro Tip
When sign-carving with a round nose bit, rout your straight, easy sections first and save tight curves and lettering for last — by then you’ve re-calibrated your feel for the bit’s cutting speed on that particular piece of wood.
Buying Advice
Buy the three-size set rather than a single bit; having a small, medium, and large round nose covers fine detail work, standard finger pulls, and bold decorative flutes without needing separate purchases later.
SEO Image Caption
Round nose core box router bit set for flutes, finger pulls, and sign carving.
SEO ALT Text
Round nose core box router bit set for grooves and decorative flutes
Conclusion
This round nose set covers a surprising amount of ground in the shop, from a fine decorative flute to a full finger-pull groove — three sizes on hand means you’re rarely stuck without the right radius for the job.
Router Bit Maintenance & Storage
Even the highest-quality router bit won’t deliver clean, accurate cuts if it’s neglected. Resin buildup, dull carbide edges, rusty shanks, or worn bearings can lead to burning, tear-out, poor surface finishes, and even unsafe operation. Regular maintenance not only improves cutting performance but also extends the life of your router bits, saving money in the long run. Whether you’re an occasional DIY enthusiast or a professional cabinet maker, following a simple maintenance routine will help keep your router bits performing at their best.
Why Router Bit Maintenance Matters
Router bits are precision cutting tools, and even a small amount of neglect can affect their performance. Resin buildup, dull cutting edges, worn bearings, or rust can lead to rough cuts, excessive burning, tear-out, increased strain on the router motor, and poor overall results. Regular maintenance not only keeps your router bits cutting cleanly and accurately but also improves safety and extends their service life. Spending just a few minutes cleaning and inspecting your bits after each project can save money on replacements and help maintain professional-quality woodworking results.
Cleaning Resin and Pitch Buildup
During routing, resin, sap, glue residue, and pitch gradually accumulate on the carbide cutting edges. This buildup prevents the bit from cutting efficiently, causing excessive heat, burn marks, rough finishes, and unnecessary stress on the router motor. After every few projects, remove the buildup using a dedicated router bit cleaner or a non-corrosive resin remover. Apply the cleaner, allow it to loosen the deposits, then gently scrub the bit with a soft nylon or brass brush. Avoid using steel brushes, which can damage the carbide edges. Once clean, wipe the bit dry before storing it to prevent moisture-related corrosion.
Choosing Safe Cleaning Products
Professional router bit cleaners are specifically designed to dissolve pitch and resin without damaging carbide or bearings. Citrus-based cleaners are also a popular and environmentally friendly option for routine maintenance. Avoid harsh chemicals such as bleach, strong acids, or caustic cleaners, as they can damage the protective coating, weaken bearings, or promote corrosion. Whatever cleaner you choose, always follow the manufacturer’s instructions and ensure the bit is completely dry before returning it to storage.
Router Bit Maintenance & Storage
Even the highest-quality router bit won’t deliver clean, accurate cuts if it’s neglected. Regular cleaning, proper storage, and routine inspection help maintain cutting performance, improve safety, and extend the life of your router bits.
Cleaning and Inspection
After each project, remove resin, pitch, and dust using a router bit cleaner and a soft nylon brush. Inspect the carbide edges and guide bearings for damage or excessive wear before storing the bit.
Proper Storage
Store router bits in a dedicated case or wooden holder with the cutting edges protected. Keep them in a clean, dry place to prevent rust and accidental damage.
Sharpening and Replacement
If a router bit begins burning wood, produces rough cuts, or requires excessive force even after cleaning, it may need professional sharpening or replacement. Never continue using a chipped or damaged router bit, as it can reduce cut quality and create safety risks.
Final Thoughts
Thirteen bits, thirteen very different jobs — but the underlying principles stay the same across every one of them: take multiple light passes instead of one heavy pass, match your feed rate to the wood in front of you, test on scrap before you touch project material, and always know which direction the bit wants to pull the workpiece. Build those habits around any router bit, and the bit will do exactly what it was designed to do.
Affiliate Disclosure
This article may contain affiliate links. If you purchase a product through these links, TOOLSCRAFTERS may earn a small commission at no additional cost to you. We only recommend router bits and woodworking tools that we believe offer genuine value to woodworkers, DIY enthusiasts, and professionals. Your support helps us create more detailed guides and tutorials.
About the Author
TOOLSCRAFTERS Editorial Team
The TOOLSCRAFTERS Editorial Team creates practical woodworking, carpentry, power tool, and furniture-making guides based on industry research, product analysis, and real workshop experience. Our goal is to help DIY enthusiasts, hobbyists, and professional woodworkers choose the right tools, improve their skills, and complete projects with confidence through detailed, easy-to-understand content.