
Adjustable Hole Saw Cutter: Complete Buying Guide (2026)
Introduction
Walk into almost any cabinet shop or electrician’s van and you’ll find a small tin or roll of fixed-size hole saws — half a dozen sizes, each one bought for a specific job, most of them used once or twice a year. It’s an old problem in woodworking and installation trades: you rarely know exactly what size hole you’ll need until you’re standing in front of the workpiece.
An adjustable hole saw cutter solves that problem differently. Instead of stocking a full set of individual hole saws, you carry one tool that adjusts to a range of diameters. Loosen a screw, slide the arm, tighten it back down, and you’ve changed the cutting size without opening a second tool case.
This guide walks through what an adjustable hole saw cutter actually is, how it works mechanically, who benefits most from owning one, and where it falls short compared to fixed hole saws or industrial cutting equipment. The goal is a practical, honest picture — not a sales pitch — so you can decide whether this tool belongs in your kit.
What Is an Adjustable Hole Saw Cutter?
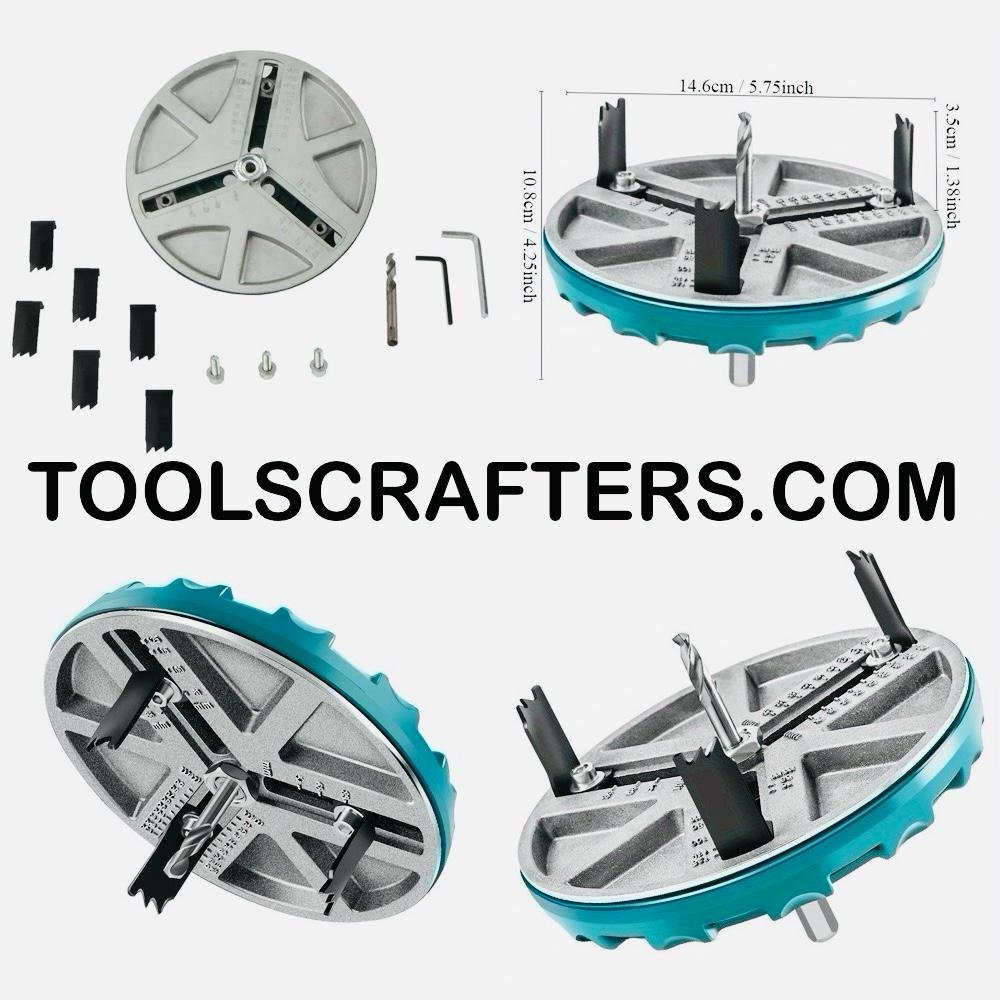
An adjustable hole saw cutter, sometimes called an adjustable circle hole cutter or multi size hole cutter, is a drill attachment built around a central pilot bit and one or two sliding cutting arms. Instead of a fixed cup-shaped blade like a traditional hole saw, the arm carries a small cutting blade that can be repositioned along a graduated bar or base plate.
Move the arm further from the center pilot bit, and the circle gets bigger. Move it closer, and the circle shrinks. Once the arm is set where you want it, a locking screw holds that position while the tool spins with your drill.
It’s worth being upfront about what this is and isn’t. An adjustable wood hole cutter is a hand-tool solution for flexible, one-off, or occasional circular cutting — not a precision production instrument. If you’re cutting hundreds of identical holes a day, this isn’t the tool for that job. But for the kind of varied work most carpenters, cabinet makers, and electricians actually do, it earns its place in the toolbox.
How It Works
The mechanics are simpler than they look. A standard drill chuck holds the shank of the tool. At the center is a pilot bit, which goes into the workpiece first and keeps the whole assembly centered as it spins. Attached to a base plate or bar running outward from that center point is one or more adjustable arms, each holding a small cutting blade.
When the drill spins the assembly, the pilot bit keeps the center fixed while the blade — set at your chosen distance — traces a circle through the material. As the blade works its way down, it separates a circular disc from the surrounding material, leaving a clean hole behind (and often leaving the cut-out disc intact, which is genuinely useful if you need that piece too).
Because the cutting action depends on the arm spinning cleanly and evenly, the tool works best in a drill press or with a very steady handheld drill. A wobble in the drill translates directly into a wobble in the hole.
How Adjustable Arms Determine Hole Size
This is the part that trips up first-time users, so it’s worth explaining clearly. The distance between the center pilot bit and the cutting blade is the radius of the hole you’re about to cut — not the diameter. Double that distance, and you get the diameter of the finished hole.
Most tools have a scale or graduated markings along the arm to help you set this distance without guesswork, but manufacturers vary in how they mark it — some show radius, some show diameter directly. Because of that inconsistency, the safest habit is to always run a test cut on a scrap piece of the same material before cutting your actual workpiece. It takes an extra two minutes and saves you from ruining a cabinet panel over a misread scale.
The exact adjustable range — the smallest and largest hole a given tool can cut — depends entirely on the manufacturer and model. Some are built for smaller trim and electrical work, others for larger cabinet cutouts. Always check the specific product’s listed range rather than assuming one tool covers every job.
Why One Adjustable Tool Replaces Multiple Hole Saws
Think about what a “complete” fixed hole saw collection actually requires. To cover a reasonable spread of common sizes, you’re looking at six, eight, sometimes a dozen individual cutters, each one a separate purchase, each one taking up its own slot in a case.
An adjustable hole saw compresses that entire range into one tool. You’re not buying a new hole saw every time a job calls for a size you don’t already own. You’re not digging through a case trying to find the right one by eye. And when a project comes up unexpectedly — a client asks for a slightly larger cable pass-through, or a ventilation hole needs to be a size you didn’t plan for — you adjust the arm instead of making a supply run.
That said, this trade-off isn’t free. A dedicated fixed hole saw is generally sturdier for repeat use at one size, and there’s no adjustment step to double-check before every cut. The adjustable tool wins on flexibility and storage; the fixed hole saw wins on repeatability and raw toughness for heavy, repetitive work. Most professionals end up owning both and reaching for whichever fits the job in front of them.
Why Cabinet Makers Use It
Cabinet work is full of small, variable-size holes that don’t follow a single standard. Cable management holes in the back panel of an entertainment unit, speaker cutouts in a custom media cabinet, ventilation holes behind an appliance, grommet holes for wire routing on a desk — none of these sizes are identical from job to job, and they’re rarely large enough to justify a dedicated fixed hole saw purchase.
An adjustable circle hole cutter lets a cabinet maker dial in the exact size a specific job calls for, cut it cleanly in plywood, MDF, or laminate board, and move on. It’s also useful during prototyping or custom furniture work, when a client’s specifications might shift mid-project and the hole size needs to change with them.
For related cutting and routing setups, our guide on [router bits for woodworking beginners](https://toolscrafters.com/) covers another common cabinet-shop cutting task worth understanding alongside hole cutting.
Why Electricians Use It
Electrical rough-in work involves a lot of circular cutting that doesn’t fit neatly into “one size fits all.” Ceiling light fixtures, junction box openings, conduit pass-throughs, and interior device installations all call for holes sized to the specific fixture or box being installed — and fixture sizes vary by manufacturer and model.
Rather than carrying a full set of fixed hole saws to cover every possible fixture size, many electricians keep one adjustable hole cutter in the van for gypsum board and drywall work. It’s faster to adjust on-site than to run back out for the right size, particularly on jobs where the electrician is installing fixtures from several different suppliers in the same day.
It’s worth being clear here too: this tool is suited to softer building materials like drywall and gypsum board, not metal electrical boxes or conduit itself. Always match the tool to the material it’s rated for.
Key Features
When comparing adjustable hole saw cutters, a few features consistently separate a well-built tool from a frustrating one:
Locking mechanism. A secure screw or clamp lock keeps the arm from drifting mid-cut. A loose lock is the single biggest cause of inaccurate or wobbly holes.
Pilot bit quality and replaceability. The pilot bit takes a lot of wear. Being able to replace it separately extends the life of the whole tool.
Blade material. Cutting blade material affects how well the tool holds an edge and how it performs across different materials — though exact hardness and material specifications vary by manufacturer and should be checked on the specific product listing.
Base plate rigidity. A flexible or thin base plate can flex under cutting pressure, which shows up as an uneven or oval hole instead of a true circle.
Arbor/shank compatibility. Confirm the shank fits your drill chuck size before buying.
Benefits
– One tool covers a range of hole sizes instead of a shelf full of individual hole saws
– Lower total tool investment for occasional and medium-volume work
– Less case and drawer space needed in the workshop or van
– Faster to adjust on-site than swapping tools or making a supply run
– Works across a range of common building and furniture materials
– Well suited to custom or one-off work where the exact size isn’t known in advance
Compatible Materials
Adjustable hole saw cutters are generally suited to softer, workable sheet materials, including:
– Plywood
– MDF
– Gypsum board
– Drywall
– PVC sheets
– Laminate board
– Soft wood
They are not designed for hardened materials, metal, masonry, or tile. Attempting to force one through material it isn’t rated for is one of the fastest ways to damage the blade, the arm, or the workpiece — and it’s a genuine safety risk. Always confirm material compatibility on the specific product before use.
Common Applications
– Cabinet making and custom furniture panels
– Furniture manufacturing
– General carpentry
– Ceiling light installation
– Ventilation openings
– Cable pass-through holes
– Speaker cutouts
– Electrical box and conduit openings in drywall or gypsum board
– DIY woodworking projects
Adjustable Hole Saw vs Fixed Hole Saw
| Factor | Adjustable Hole Saw | Fixed-Size Hole Saw |
|—|—|—|
| Size flexibility | Wide range from one tool | One size per tool |
| Storage space | Compact, single tool | Grows with each size owned |
| Upfront cost | One purchase covers a range | Cost adds up across sizes |
| Setup time | Requires adjusting and locking arm each time | Ready to use immediately |
| Durability for repeat use | Generally less robust for constant, identical cuts | Built to handle repeated cuts at one size |
| Best suited for | Varied, occasional, or custom-size jobs | High-volume, repeat cuts at a known size |
Adjustable Hole Saw vs Hole Saw Kit
| Factor | Adjustable Hole Saw | Hole Saw Kit (Multiple Fixed Sizes) |
|—|—|—|
| Number of tools carried | One | Several, boxed together |
| Coverage between standard sizes | Continuous adjustment within its range | Limited to the sizes included in the kit |
| Precision at a specific known size | Requires careful setting and test cuts | Exact size guaranteed by design |
| Cost | Usually lower than a full kit | Higher, but no adjustment needed |
| Ideal use case | Unpredictable or custom sizing | Known, repeatable size requirements |
Can Beginners Use an Adjustable Hole Saw?
Yes, with a bit of patience. The learning curve isn’t steep, but it does exist — mainly around setting the arm accurately and getting comfortable with test cuts before committing to a workpiece. Beginners sometimes assume the tool works exactly like a fixed hole saw straight out of the box, which leads to rushed, inaccurate first attempts.
The best way to start is on scrap plywood or MDF, at a slow drill speed, with the material clamped down securely. Once you’ve made a few practice cuts and understand how the arm’s scale corresponds to the actual finished hole, the process becomes routine.
Can It Cut Hardwood?
This depends heavily on the specific tool and blade quality, and manufacturers differ in what they recommend. Softer woods and manufactured sheet goods like plywood and MDF are generally the safer, more predictable use case. Dense hardwoods put more strain on the arm, blade, and locking mechanism, and results can be inconsistent depending on the tool’s build quality.
If hardwood cutting is a regular part of your work, check the manufacturer’s specific guidance for that product before relying on it, and consider testing on an offcut first rather than assuming it will perform the same as it does on softer material.
Buying Guide
A few practical things to check before buying an adjustable hole saw cutter:
Confirm the adjustable range. Every model has a different minimum and maximum diameter, and this varies by manufacturer — check the listing rather than assuming.
Check shank and chuck compatibility. Make sure the tool’s shank matches your drill’s chuck capacity.
Look at the locking system. A tool with a flimsy or plastic locking screw is more likely to slip mid-cut.
Consider blade replaceability. Being able to swap a dull or damaged blade extends the tool’s usable life significantly.
Read real user feedback on the specific product, not just the manufacturer’s description, since build quality varies a lot between brands at this price point.
Match it to your actual work. If you mostly need a handful of common sizes repeatedly, a hole saw kit might serve you better. If your work is varied and unpredictable, the adjustable tool is the stronger fit.
Installation Guide
1. Insert the shank into your drill chuck and tighten securely, the same way you would with any drill bit.
2. Set the cutting radius by loosening the arm’s lock screw and sliding it to your target distance from the pilot bit, using the tool’s scale as a starting reference.
3. Tighten the lock screw firmly. Give the arm a light check by hand to make sure it doesn’t shift.
4. Mark your center point on the workpiece clearly before drilling.
5. Clamp the workpiece to a stable surface. Never attempt this cut on material that can shift or spin.
6. Start the drill at a low speed to let the pilot bit engage and center itself before increasing speed gradually.
7. Apply steady, even pressure and let the blade do the cutting rather than forcing it through the material.
8. Back the drill out slowly once the cut is complete, and check the hole before moving to the next one.
A quick test cut on scrap material of the same type is strongly recommended before cutting your actual workpiece, especially the first few times you use a new tool.
Maintenance
Keep the pilot bit and cutting blade clear of resin, sawdust buildup, and debris after each use — a build-up on the blade edge dulls it faster and makes future cuts rougher. Check the locking screw periodically for wear, since a stripped or loose lock is one of the most common reasons an otherwise good tool starts producing inaccurate holes. Store the tool in a dry case to prevent rust on the metal arm and blade, and inspect the blade edge before each project, replacing it if it’s visibly dull or chipped.
Safety Tips
– Always wear eye protection when cutting; circular cutting throws debris outward.
– Clamp the workpiece securely. Never hold material by hand while cutting.
– Keep hands and fingers well clear of the spinning arm and blade.
– Start at a low drill speed and increase gradually rather than starting at full speed.
– Don’t force the tool through material that resists — back off and check the setup instead.
– Unplug or remove the battery from the drill before adjusting the arm or changing the blade.
– Never use the tool on materials it isn’t rated for, including metal, masonry, or tile.
Common Mistakes
– Setting the arm using the diameter scale as if it were the radius, or vice versa — always confirm which measurement the scale shows before cutting.
– Skipping the test cut and going straight to the final workpiece.
– Over-tightening or under-tightening the locking screw, both of which cause inaccurate cuts.
– Running the drill too fast, which increases wobble and can burn the material’s edge.
– Cutting unsupported material, leading to tear-out or a ruined workpiece.
– Using the tool on materials outside its intended range, like hardened wood or metal.
Troubleshooting
The hole comes out oval instead of round. This usually points to a loose locking screw or a base plate flexing under pressure. Check the lock, and confirm the workpiece is clamped firmly.
The blade is burning the material. Typically caused by running the drill too fast for the material, or a blade that’s gone dull and is generating excess friction instead of cutting cleanly.
The tool binds or stalls mid-cut. Often a sign of feeding too fast for the material’s density, or the blade angle needing adjustment. Ease off and let the blade work at its own pace.
The finished hole is the wrong size. Almost always traced back to misreading the arm’s scale. Re-check whether it’s marked in radius or diameter, and re-measure with a separate ruler if you’re unsure.
Limitations
An adjustable hole saw cutter is a flexible hand-tool solution, not an industrial one. It doesn’t replace CNC hole-cutting systems or dedicated production equipment where speed, tolerance, and repeatability at scale matter. It’s generally not intended for hardened materials, metal, or masonry. Build quality varies significantly between manufacturers at this price category, so a budget model and a well-built one can perform very differently. And because accuracy depends on correctly reading and locking the arm each time, it demands more attention from the user than a fixed hole saw does.
Frequently Asked Questions
1. What is an adjustable hole saw cutter used for?
It’s used to cut circular holes of varying sizes in materials like plywood, MDF, gypsum board, and drywall, using one adjustable tool instead of several fixed-size hole saws.
2. How do I set the correct hole size on an adjustable hole cutter?
Loosen the arm, position it at your target radius or diameter (check which measurement your tool’s scale shows), lock it firmly, and confirm with a test cut on scrap material.
3. Can an adjustable hole saw cut metal or tile?
No. These tools are generally designed for softer sheet materials like wood, MDF, and drywall, not metal, masonry, or tile.
4. What drill speed should I use with an adjustable hole cutter?
It depends on the material and the specific tool, so there’s no single number that applies to every job. Start slow and increase gradually rather than beginning at full speed.
5. Is an adjustable hole saw as accurate as a fixed-size hole saw?
A fixed hole saw is generally more consistent since there’s no adjustment step involved. An adjustable tool can be just as accurate with proper setup and a test cut, but it requires more care from the user.
6. What materials can’t be cut with this tool?
Hardened materials, metal, masonry, and tile are generally outside its intended use. Always check the specific manufacturer’s guidance.
7. How do I stop the hole saw from wobbling?
Check that the locking screw is fully tightened, confirm the workpiece is clamped securely, and make sure the drill itself is running steady rather than handheld and unsteady.
8. Is it safe to use an adjustable hole cutter on a handheld drill, or is a drill press recommended?
Both are used in practice, but a drill press generally gives steadier, more accurate results. A handheld drill can work well if held firmly and run at a controlled speed.
9. How long do the blades last?
This depends on the blade material, the hardness of what you’re cutting, and how often it’s used — factors that vary by manufacturer and usage pattern rather than a fixed lifespan.
10. Can electricians use this for standard device box cutouts?
Yes, many electricians use adjustable hole cutters for gypsum board and drywall openings for ceiling lights, junction boxes, and similar interior installations.
Final Verdict
An adjustable hole saw cutter earns its place in a toolbox by solving a specific, common problem: needing a range of hole sizes without buying and storing a full set of individual hole saws. It’s a strong fit for cabinet makers handling varied custom work, electricians dealing with different fixture sizes on interior jobs, and DIY users who’d rather own one flexible tool than several single-purpose ones.
It’s not the right choice for high-volume, identical-size production work, and it isn’t built for hardened materials or metal. Used within those boundaries — on plywood, MDF, gypsum board, drywall, and similar materials, with a proper test cut and a secure setup — it’s a genuinely useful, practical addition to a woodworking or installation toolkit.
Affiliate Disclosure
ToolsCrafters.com is a participant in the Amazon Services LLC Associates Program, an affiliate advertising program designed to provide a means for sites to earn advertising fees by advertising and linking to Amazon.com. As an Amazon Associate, we earn from qualifying purchases. The recommendations and information on this page are based on our own research and workshop knowledge, and our participation in the Amazon Affiliate program does not influence our content or recommendations. Prices and product availability are subject to change.
About the Author
Md Vajeed is the founder of TOOLSCRAFTERS and writes about woodworking tools, power tools, cabinet-making accessories, furniture hardware, workshop equipment, and DIY solutions. His articles focus on practical woodworking techniques, honest buying guides, and real-world tool knowledge that helps carpenters, furniture manufacturers, electricians, contractors, and DIY enthusiasts choose the right tools with confidence.