
Best Angle Grinder Stand: Complete Buying Guide (2026)
Angle Grinder Stand: The Complete Guide for Fabricators, Welders, and Workshop Users
By Md Vajeed
Last Updated: July 2026
If you’ve ever tried to cut a straight line through a piece of angle iron with nothing but a handheld grinder and a steady hand, you already know the problem. The disc wanders. The cut edge comes out slightly beveled when it shouldn’t be. Your arms are tired by the twentieth piece, and no two cuts look quite the same.
An angle grinder stand exists to solve exactly that problem. It doesn’t get much attention until you need repeatable, controlled cuts on a regular basis — and then it quickly becomes one of the most-used fixtures in the workshop.
This guide covers what an angle grinder stand is, how it works, who uses it and why, what it can and can’t do, and how to buy, install, and maintain one safely. Where specifications like disc size, cutting capacity, or motor power come into play, we’ll say plainly that these depend on the specific grinder and stand you’re using — because they do.
What Is an Angle Grinder Stand?
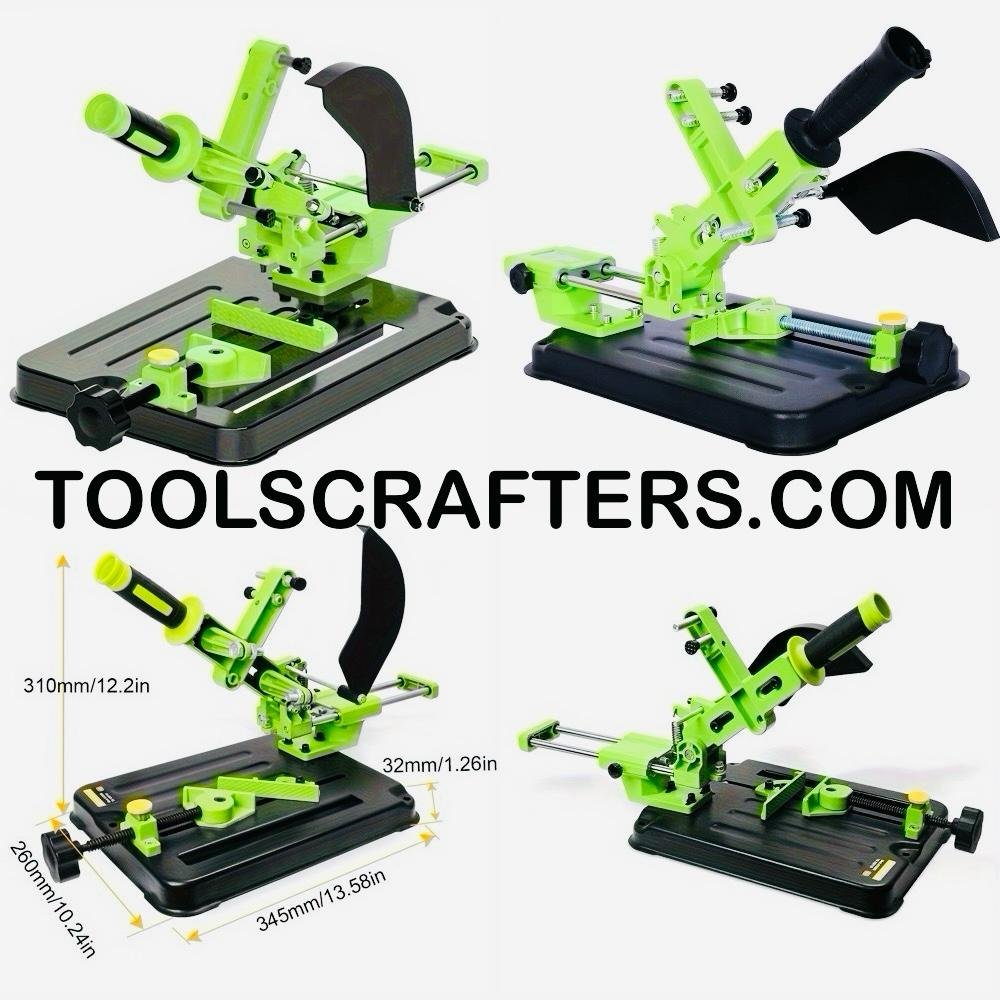
An angle grinder stand is a mounting fixture that holds a handheld angle grinder in a fixed position and lets you lower it onto a workpiece using a pivoting arm, instead of moving the grinder freehand.
In practical terms, it turns a tool you’d normally grip with two hands into something closer to a small stationary cut-off machine. The grinder itself doesn’t change — same disc, same motor, same tool you’d use handheld. What changes is how it’s positioned and controlled.
Most stands consist of a base (bolted to a bench or left freestanding), a clamping bracket that holds the grinder body, and a hinged or pivoting arm that brings the spinning disc down onto the material in a controlled, vertical motion. Many also include a material clamp or vise to hold the workpiece steady during the cut.
Naming isn’t fully standardized in this category. You’ll see the same product listed as an angle grinder cutting stand, chop saw stand, base stand, conversion stand, or cutting machine stand. Most of these terms describe the same basic category — a fixture that converts a handheld grinder into a bench-mounted cutting setup. A few sellers reserve “chop saw stand” for heavier-duty pivot designs, but there’s no universal rule, so it’s worth reading the actual product description rather than the name alone.
How It Works
The mechanics are fairly simple, which is part of the appeal.
The grinder is secured into a clamp or bracket on the pivoting arm, usually positioned so the disc faces downward toward the base. The arm is mounted on a hinge or pivot point, often with a return spring that lifts the grinder back up once pressure is released.
To make a cut, you position the workpiece against the base or in a clamp, switch on the grinder, and pull the arm down in a controlled motion so the disc passes through the material. Because the arm travels along a fixed pivot, the cutting path stays consistent from one piece to the next instead of depending on how steady your hands are that day.
Some stands allow the pivot or base to be adjusted for angled cuts or depth. Whether a specific model supports this, and what range it covers, depends entirely on the product — this varies too much to generalize.
The grinder clamping system is also worth understanding. Most stands use adjustable brackets or collar clamps built to fit a range of grinder body diameters, but not every stand fits every grinder. Compatibility depends on your specific grinder model, so it’s something to verify before buying rather than assume.
Why an Angle Grinder Stand Is Better Than Freehand Cutting
“Better” is doing some work in that heading, so let’s be specific.
Straightness of cut. Freehand accuracy depends entirely on how steady you hold the grinder through the full motion. A stand removes most of that variability because the arm travels along one fixed path.
Repeatability. If you need twenty identical lengths of tube for a railing or a batch of brackets, a stand makes those cuts look like they came from the same setup — because they did. Freehand cutting, even by a skilled operator, tends to drift slightly piece to piece.
Reduced fatigue. Holding a grinder steady against resistance for an extended session is physically tiring, especially on thicker material. A stand takes that load off your arms and shoulders.
Control over small or awkward pieces. Short offcuts and thin bar stock are genuinely hard to hold and cut freehand at once. A stand with a clamp lets you secure the piece independently of the cutting motion.
None of this makes a grinder stand a replacement for a purpose-built industrial cutting machine — more on that later — but relative to freehand cutting with the same grinder, the stability and consistency gains are real, and they’re the entire reason this product category exists.
Why Professionals Use It
Ask a fabricator why they bothered adding a grinder stand to a shop that already has proper cutting equipment, and the answer is usually about flexibility rather than raw capability.
Welders often keep one at a secondary station for quick, repetitive cuts that don’t justify walking across the shop to the chop saw — trimming stock before welding, or making small adjustment cuts on a part already tacked in place.
Maintenance technicians working on-site value that a grinder stand is far more portable than a stationary saw. The grinder does double duty — it comes off the stand for handheld grinding or cutting in tight spaces, then goes back on when a batch of clean, straight cuts is needed.
Cabinet makers and furniture builders who work mostly in wood but occasionally need metal brackets or frame components use a grinder stand as a low-cost way to handle that occasional need without buying a dedicated metal-cutting machine.
In every case, the reason is the same: meaningfully better cut quality than freehand work, without the cost, footprint, or single-purpose nature of an industrial saw.
Common Workshop Applications
These reflect general, reasonably common uses. Whether your specific grinder and disc combination suits any of them depends on your equipment and the disc’s rating — always check before cutting. If you’re still deciding between a stand and other cutting setups, our [angle grinder buying guide](/angle-grinder-buying-guide/) covers grinder selection in more depth.
– Mild steel bar, sheet offcuts, and structural sections
– Steel pipe and round tube
– Square and rectangular tube
– Flat bar stock
– Angle iron
– Aluminium profiles, when paired with a disc rated for non-ferrous metal
– Metal furniture frames and legs
– Gate and fence fabrication
– Window and door frame metalwork
– General workshop fabrication and prototyping
– Maintenance and repair cutting
– DIY and hobby metalworking projects
Compatible Materials
Steel. This is the primary use case for most angle grinder stands, and where they perform most consistently — mild steel bar, tube, pipe, and structural sections are the bread-and-butter application.
Aluminium. Cutting aluminium requires a disc specifically rated for non-ferrous metal. A standard steel-cutting disc can clog and grab the material, which is both a poor cut and a safety hazard.
Wood. This is where extra caution matters. Some grinder and stand combinations can be used with wood-rated blades or carbide-tipped discs designed specifically for wood, but this is not universal, and it’s absolutely not something to attempt with a standard abrasive metal-cutting disc — that’s a genuine kickback risk. If wood cutting matters to you, confirm first, from the grinder manufacturer, that your specific grinder supports it with the correct disc type. Never assume compatibility just because a stand physically holds the grinder in place.
Across all materials, the stand doesn’t change what your grinder and disc are rated to cut — only how the cut is performed. Disc selection and manufacturer guidance still govern what’s safe. See our [cutting disc selection guide](/cutting-disc-guide/) for more on matching discs to materials.
Key Features
Feature sets vary between models, but most angle grinder stands are built around a few core elements:
Base and mounting. Some stands bolt to a workbench for permanent use; others sit freestanding with a footprint large enough for its own stability. Base material — cast metal, welded steel, or stamped sheet — affects rigidity and vibration during cutting.
Grinder clamp or bracket. The part that holds your grinder, usually an adjustable collar sized for a range of grinder bodies. Fit isn’t universal, so this is the single most important compatibility check before buying.
Pivot arm and return mechanism. Carries the grinder down onto the workpiece, typically spring-assisted so it lifts back to neutral when released.
Workpiece clamp or vise. Many, though not all, stands include a way to secure the material. A separate bench vise can substitute if the stand doesn’t include one.
Angle or depth adjustment. Present on some models, absent on others — confirm directly rather than assume if angled cuts matter to your work.
Guard compatibility. A properly designed stand shouldn’t require removing your grinder’s disc guard to fit the clamp. If it does, that’s a red flag worth avoiding.
Benefits
Bringing together everything above, the practical benefits come down to:
– More consistent, straighter cuts than freehand operation
– Better repeatability across multiple identical cuts
– Reduced physical fatigue during extended cutting sessions
– Easier handling of small or awkward workpieces
– A lower-cost, more portable alternative to a dedicated cutting machine for occasional or moderate metalworking needs
– The flexibility to remove the grinder and use it handheld when needed
Angle Grinder Stand vs Chop Saw
This is one of the most common points of confusion for shoppers in this category, so it’s worth laying out plainly.
| Factor | Angle Grinder Stand | Chop Saw |
|—|—|—|
| Core design | Repurposes your existing handheld grinder | Purpose-built stationary cutting machine with its own dedicated motor |
| Portability | Generally lighter and easier to move; grinder detaches for handheld use | Typically heavier and intended to stay in one location |
| Cost | Usually a lower-cost addition, especially if you already own a grinder | Higher upfront cost as a complete standalone machine |
| Cutting consistency | Improved over freehand, but performance still depends on your grinder and disc | Generally more consistent for high-volume, heavy-duty repetitive cutting |
| Versatility | Grinder can be used handheld for grinding, deburring, and other tasks | Dedicated to cutting only |
| Best suited for | Light to moderate cutting needs, occasional use, mixed workshop tasks | Frequent, high-volume, or heavy-duty production cutting |
The honest takeaway: a grinder stand is a genuinely useful upgrade over freehand cutting, but it’s not a substitute for an industrial chop saw, cold saw, or band saw in a production environment. If you’re cutting the same material in high volume every day, a dedicated saw will likely serve you better. If your needs are occasional, mixed with other grinder tasks, or you need something portable, a stand is often the more practical choice.
Can Beginners Use an Angle Grinder Stand?
Yes, with the same caution that applies to any power tool. A stand can actually make cutting safer for a less experienced user than freehand work, since it removes variables — the disc travels a fixed path, and the operator isn’t balancing tool control and cutting pressure by hand at once.
That said, “easier to use” doesn’t mean “no learning curve.” A beginner should read both the grinder’s and stand’s manuals before first use, understand basic disc selection, practice on scrap before cutting anything that matters, wear proper PPE every time, and learn to recognize a worn or wrong disc.
If you’re new to angle grinders generally, get comfortable with handheld operation and disc changes before introducing a stand — it simplifies the cutting motion, but doesn’t replace basic tool familiarity.
Buying Guide
Because specifications vary so much between manufacturers and models, shop by decision criteria rather than by chasing a specific number.
Check grinder compatibility first. Confirm the stand’s clamp or bracket fits your specific grinder’s body size and mounting profile — this is the single most common source of buyer disappointment.
Assess base stability. A stand that flexes or rocks under cutting pressure undermines the entire point of buying one. Look at base material, footprint, and whether it bolts down.
Look at the workpiece clamping system. Some stands include a built-in vise; others expect you to supply your own. Factor this into your budget.
Consider adjustability if you need it. If angled cuts are part of your work, confirm the stand actually supports that — don’t assume.
Think about portability vs permanence. A bench-bolted stand is more rigid but stays put. A freestanding or lighter stand travels better but may sacrifice some stability.
Check what’s included. Some stands ship with a vise, extension arm, or dust shielding; others are just the base fixture.
Read the warranty terms, and match your budget to your actual use case — a hobbyist doing occasional cuts doesn’t need the same build quality as a shop running a stand daily.
Installation Guide
Exact steps vary by model, so always follow the instructions included with your specific stand. Most installations follow a broadly similar sequence:
1. Unpack and inspect components against the parts list before starting.
2. Secure the base to your work surface if the design calls for bolting down — a stand meant to be fixed but left loose won’t perform as intended.
3. Mount the grinder into the clamp, following the manufacturer’s guidance on orientation. Don’t force a grinder into a clamp it wasn’t designed to fit.
4. Check disc guard clearance — the guard should remain in place and unobstructed by the bracket or arm.
5. Test the pivot motion with the grinder powered off, checking the arm travels smoothly and returns fully under spring tension.
6. Set any angle or depth adjustments for your intended cut, if supported.
7. Do a test cut on scrap material before cutting anything that matters, checking for wobble or unexpected resistance.
If something doesn’t seat correctly, stop and recheck compatibility rather than forcing it — a poorly seated grinder is a safety issue, not just an inconvenience.
Maintenance
Keeping a grinder stand in good order is mostly routine checks rather than intensive upkeep:
– Inspect mounting bolts and the base connection regularly — vibration from cutting can gradually loosen fasteners.
– Check the pivot hinge and return spring for wear or stiffness; a spring that no longer returns the arm smoothly should be replaced before it becomes a control issue.
– Clean metal dust and swarf from the base and clamp after use, since debris affects clamp grip and pivot smoothness over time.
– Inspect the grinder clamp for wear where it contacts the grinder body — a loose clamp can allow movement during cutting.
– Store the stand somewhere dry to avoid corrosion on unpainted components.
– Follow your grinder’s own maintenance schedule separately — the stand doesn’t change its service needs around brushes, cords, or disc mounting hardware.
Safety Tips
A grinder stand improves control, but it doesn’t remove the fundamental risks of cutting with an abrasive wheel. Treat it with the same seriousness as handheld use — see our [angle grinder safety guide](/angle-grinder-safety/) for a broader rundown of PPE and safe handling.
– Always wear eye protection, plus hearing and respiratory protection for extended or dusty sessions.
– Never remove or bypass the disc guard to make the grinder fit a stand’s clamp — if a stand requires that, it’s not designed correctly for that grinder.
– Confirm the disc is rated for the material every time, not just at setup.
– Secure the workpiece properly — a loose piece can shift or bind the disc, a serious kickback risk.
– Keep hands and loose clothing clear of the arm’s travel path.
– Let the disc reach full speed before contact, and don’t force the cut.
– Never leave a running grinder unattended on a stand.
– Inspect the disc before every session for cracks, chips, or wear.
– Unplug or remove the battery before adjusting the clamp, arm, or workpiece.
– When in doubt about a cutting task, check the manufacturer’s documentation rather than guessing.
Common Mistakes
Using the wrong disc for the material. The single most common and avoidable mistake — a disc rated for steel isn’t automatically safe on aluminium or wood.
Over-tightening the grinder clamp. Excessive force can damage the housing or distort the clamp. Snug and secure is the goal, not maximum torque.
Skipping the test cut. Jumping straight into a real workpiece without confirming the setup is stable wastes material at best and creates a safety risk at worst.
Ignoring an unstable base. A stand that rocks or shifts during cutting should be re-secured immediately, not worked around.
Forcing the arm down too fast. Rushing the cut increases resistance, disc wear, and the chance of binding or kickback.
Neglecting the disc guard. Removing it to “make things easier” defeats one of the tool’s main safety features.
Assuming universal compatibility. Buying a stand without confirming it fits your grinder model is a frequent, preventable source of frustration.
Troubleshooting
The cut comes out wobbly or uneven. Check the pivot hinge for excess play, confirm the grinder is fully seated and tightened, and verify the base isn’t rocking.
The workpiece shifts during cutting. The clamp isn’t providing enough grip — check tension and consider a secondary clamp for longer pieces.
The arm doesn’t return smoothly. Usually a worn return spring or debris buildup in the pivot hinge.
The disc binds partway through the cut. Often from feeding too quickly, an unstable workpiece, or a dulled disc that needs replacing.
Excessive vibration. Check the grinder is properly seated, mounting bolts are tight, and the disc isn’t damaged or unbalanced.
The grinder won’t seat properly. Almost always a compatibility issue between your grinder and the stand’s bracket size — don’t force it.
Frequently Asked Questions
1. What is an angle grinder stand used for?
It holds a handheld angle grinder in a fixed position for more stable, repeatable cutting than freehand operation allows.
2. Will an angle grinder stand fit any grinder brand?
Not necessarily. Fit depends on the stand’s clamp size and your grinder’s body dimensions, so check compatibility before buying.
3. Is a grinder stand safer than cutting freehand?
It improves control and consistency, but doesn’t eliminate the fundamental risks of an abrasive wheel. PPE and safe habits are still essential.
4. Can I cut aluminium with an angle grinder stand?
Yes, with a disc rated for non-ferrous metal. A standard steel-cutting disc isn’t appropriate for aluminium.
5. Can an angle grinder stand be used to cut wood?
Only with a blade designed for wood, and only if your grinder manufacturer supports that use. Never use a standard abrasive metal disc on wood.
6. What disc should I use with a grinder stand?
Disc choice depends entirely on the material being cut — the stand itself doesn’t change disc requirements.
7. Can beginners use an angle grinder stand?
Yes, with preparation: reading the manuals, understanding disc selection, and practicing on scrap material first.
8. Does an angle grinder stand replace a chop saw?
No. It’s a meaningful upgrade over freehand cutting, but a dedicated chop saw or cold saw generally outperforms it for high-volume production work.
9. How do I know if my grinder is compatible with a specific stand?
Compare your grinder’s body diameter and mounting profile against the stand’s clamp specifications. When in doubt, contact the seller before purchasing.
10. Do I still need safety gear if I’m using a stand instead of cutting freehand?
Yes, always. A stand improves control, but eye, hearing, and respiratory protection remain necessary regardless of how the grinder is mounted.
Final Verdict
An angle grinder stand is a genuinely practical addition for anyone who does regular metal cutting with a handheld grinder and wants more consistent, controlled results. It won’t replace a proper industrial cutting machine, and it shouldn’t be marketed or bought as one — but for fabricators, welders, maintenance technicians, cabinet makers handling occasional metalwork, and serious DIY users, it closes a real gap between freehand grinding and a full stationary saw setup.
The value of any specific stand comes down to how well it fits your grinder, how stable its base is, and whether its features match the cutting you actually do. Specifications vary meaningfully between manufacturers and models, so verify against your own equipment rather than assume one stand suits every setup.
Used correctly, with the right disc for the material and proper safety practices, a grinder stand can meaningfully improve both the quality and consistency of your cutting work.
Affiliate Disclosure
As an Amazon Associate, TOOLSCRAFTERS earns from qualifying purchases. This does not affect the price you pay and helps support our work in creating detailed woodworking, fabrication, power tool, and workshop guides. Our recommendations are based on technical research, practical applications, and product features—not affiliate commissions. Whenever possible, we highlight both the advantages and limitations of a tool so readers can make informed purchasing decisions.
About the Author
About the Author
Md Vajeed is the founder of TOOLSCRAFTERS and writes about woodworking tools, power tools, fabrication equipment, workshop accessories, cabinet-making tools, furniture hardware, and DIY workshop solutions.
His articles focus on practical tool applications, accurate technical information, honest buying guides, workshop safety, and real-world solutions for carpenters, fabricators, furniture manufacturers, welders, maintenance professionals, contractors, and DIY enthusiasts.
Every guide published on TOOLSCRAFTERS is carefully researched to provide reliable, easy-to-understand information that helps readers choose the right tools with confidence while avoiding exaggerated marketing claims and unsupported technical specifications.